
The Induction Forge Guide
Updated September, 2024
I used an induction forge for the first time at Clay Spencer’s shop in 2019. I was immediately intrigued by the machine and knew I could make use of one in my shop. However, I found that shopping for an induction machine for forging can be overwhelming due to the variety of options available on eBay, including differing numbers of water ports, paint schemes, and prices. After conducting my own research, and asking several vendors a lot of questions, it appears that LiHua is the primary manufacturer of many of the machines sold on eBay, with various manufacturers & distributors copying them, rebranding and repainting the machines under different names such as US Solid. These machines may vary in appearance based on the year model, but are generally of similar quality. Prices for these machines in 2025 range from $759-$1200, excluding shipping costs. I have been using a LiHua LH-15 induction heater for the past 5 years, since July 2020, and have found it to be a game changer in my forging process, streamlining the production of items I make for sale.
Aim of This Guide: This guide endeavors to demystify the realm of 15kw induction forge machines, specifically those manufactured in China, by shedding light on two predominant setups available. Whether you're embarking on assembling a “DIY machine” or opting for a ready-to-use “Turn-key” system, this guide seeks to be your compass, navigating you through the buying and setup process and hopefully make it a bit easier and provide some clarity.
Turn-Key Induction Machines - Coal Iron
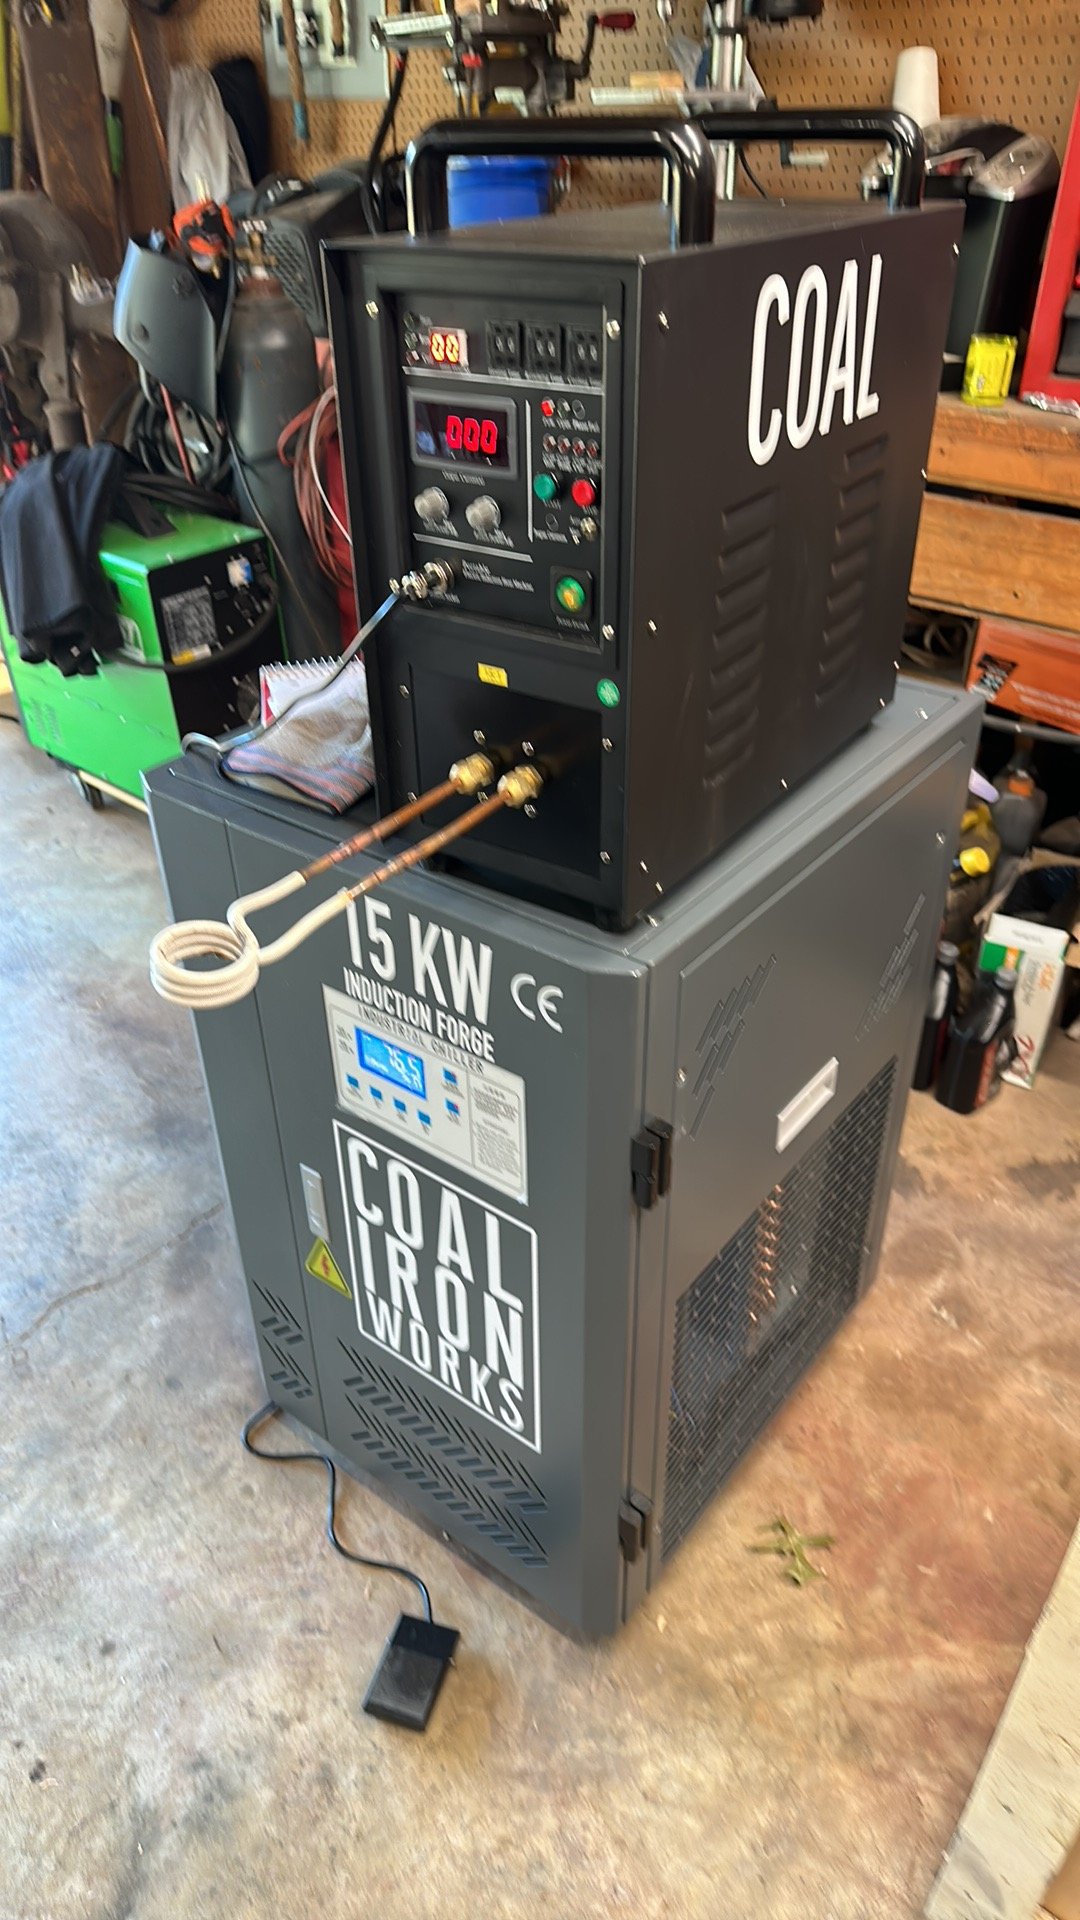
Turn-key induction machines offer a user-friendly alternative for those looking to avoid the setup and assembly process typically associated with forging machinery. Coal Ironworks, operating out of Anderson, Indiana, provides the only turn-key Induction Forge system that I am aware of. Their system combines a 15kw induction machine with an efficient water chiller, reducing the setup to merely adding 5 gallons of distilled water and connecting the machine to a 220v/50 amp NEMA 6-50 female plug. The accompanying industrial chiller is equipped with a thermostat-controlled cooling system, allowing users to maintain a specified water temperature and ensuring a steady 100% duty cycle for the machine. The cabinet also serves as a stand for the induction machine and provides storage for coils, etc. In terms of performance, it holds its ground when compared to other 15kw machines available in the market. However, the added chiller provides an extra layer of reliability, protecting against potential overheating issues. The 15kw system is priced at $2950.00, positioning itself as a practical option for those who prioritize a hassle-free setup and require consistent, reliable performance. Moreover, opting for a system from Coal Ironworks provides users with an added layer of assurance in the form of support for their induction machine—a facet not readily available to those who choose the DIY route. They also offer a more powerful 25kw version that still uses single phase power for $4495.00
I received my 15kw Coal Iron Induction machine in September of 2023. It came extremely well backed in a robust wooden crate and was delivered to my driveway with a large truck that had a lift gate. All I had to do was use a furniture dolly to bring it into the shop. To get the machine out, I had to unscrew a panel off of the crate and cut a banding strap. Setup was extremely simple and straightforward. I had to plug in the pedal, attach the included coil (mine came with a standard 1.5 inch diameter coil with ceramic fiber tubing) fill the water chiller with 5.5 gallons of distilled water and then plug into the NEMA 6-50a wall outlet that my welder was using. It took me about 15 minutes to uncrate, setup and begin heating metal. While the price is higher than the DIY rigs detailed below, if you’re looking for ease of use, outstanding support by an American company and a 100% duty cycle, this is a very good choice. For the occasional hobby user, a machine of this caliber may be overkill but if you’re a school, a blacksmith/bladesmith teaching facility, a production shop, or someone who just wants to have 100% duty cycle capability and support, this machine is made for you.
The water chiller cabinet functions as the stand for the induction machine and has a thermostat that allows you to set the temperature of the water. In my humid environment in Mississippi Coal Iron suggested that I keep the water temp set near the dewpoint to avoid condensation forming on the lines inside the induction machine. The chiller system inside the cabinet looks robust and well built. All the chiller components are wrapped or covered in insulation and the cabinet is on wheels and is sturdy and well made. There is also some storage in the cabinet where extra coolant or coils could be kept if needed. You can hear the water chiller engage to cool the system occasionally and it does not take long to drop the water temperature, at which point the chiller disengages and all you can hear is the fan running. I’ve been using the system for almost two months and so far, I have had no issues with the machine and have been pleased with the performance.
DIY Machines
These are induction rigs that need to be assembled from the various parts: induction machine, cooler, plumbing, electrical, etc. They are NOT ‘turnkey’ systems, and you are responsible for the power wiring, making that wiring safe, plumbing out the water lines, making a cart if you desire, etc.
What you will need to assemble a “DIY Machine”
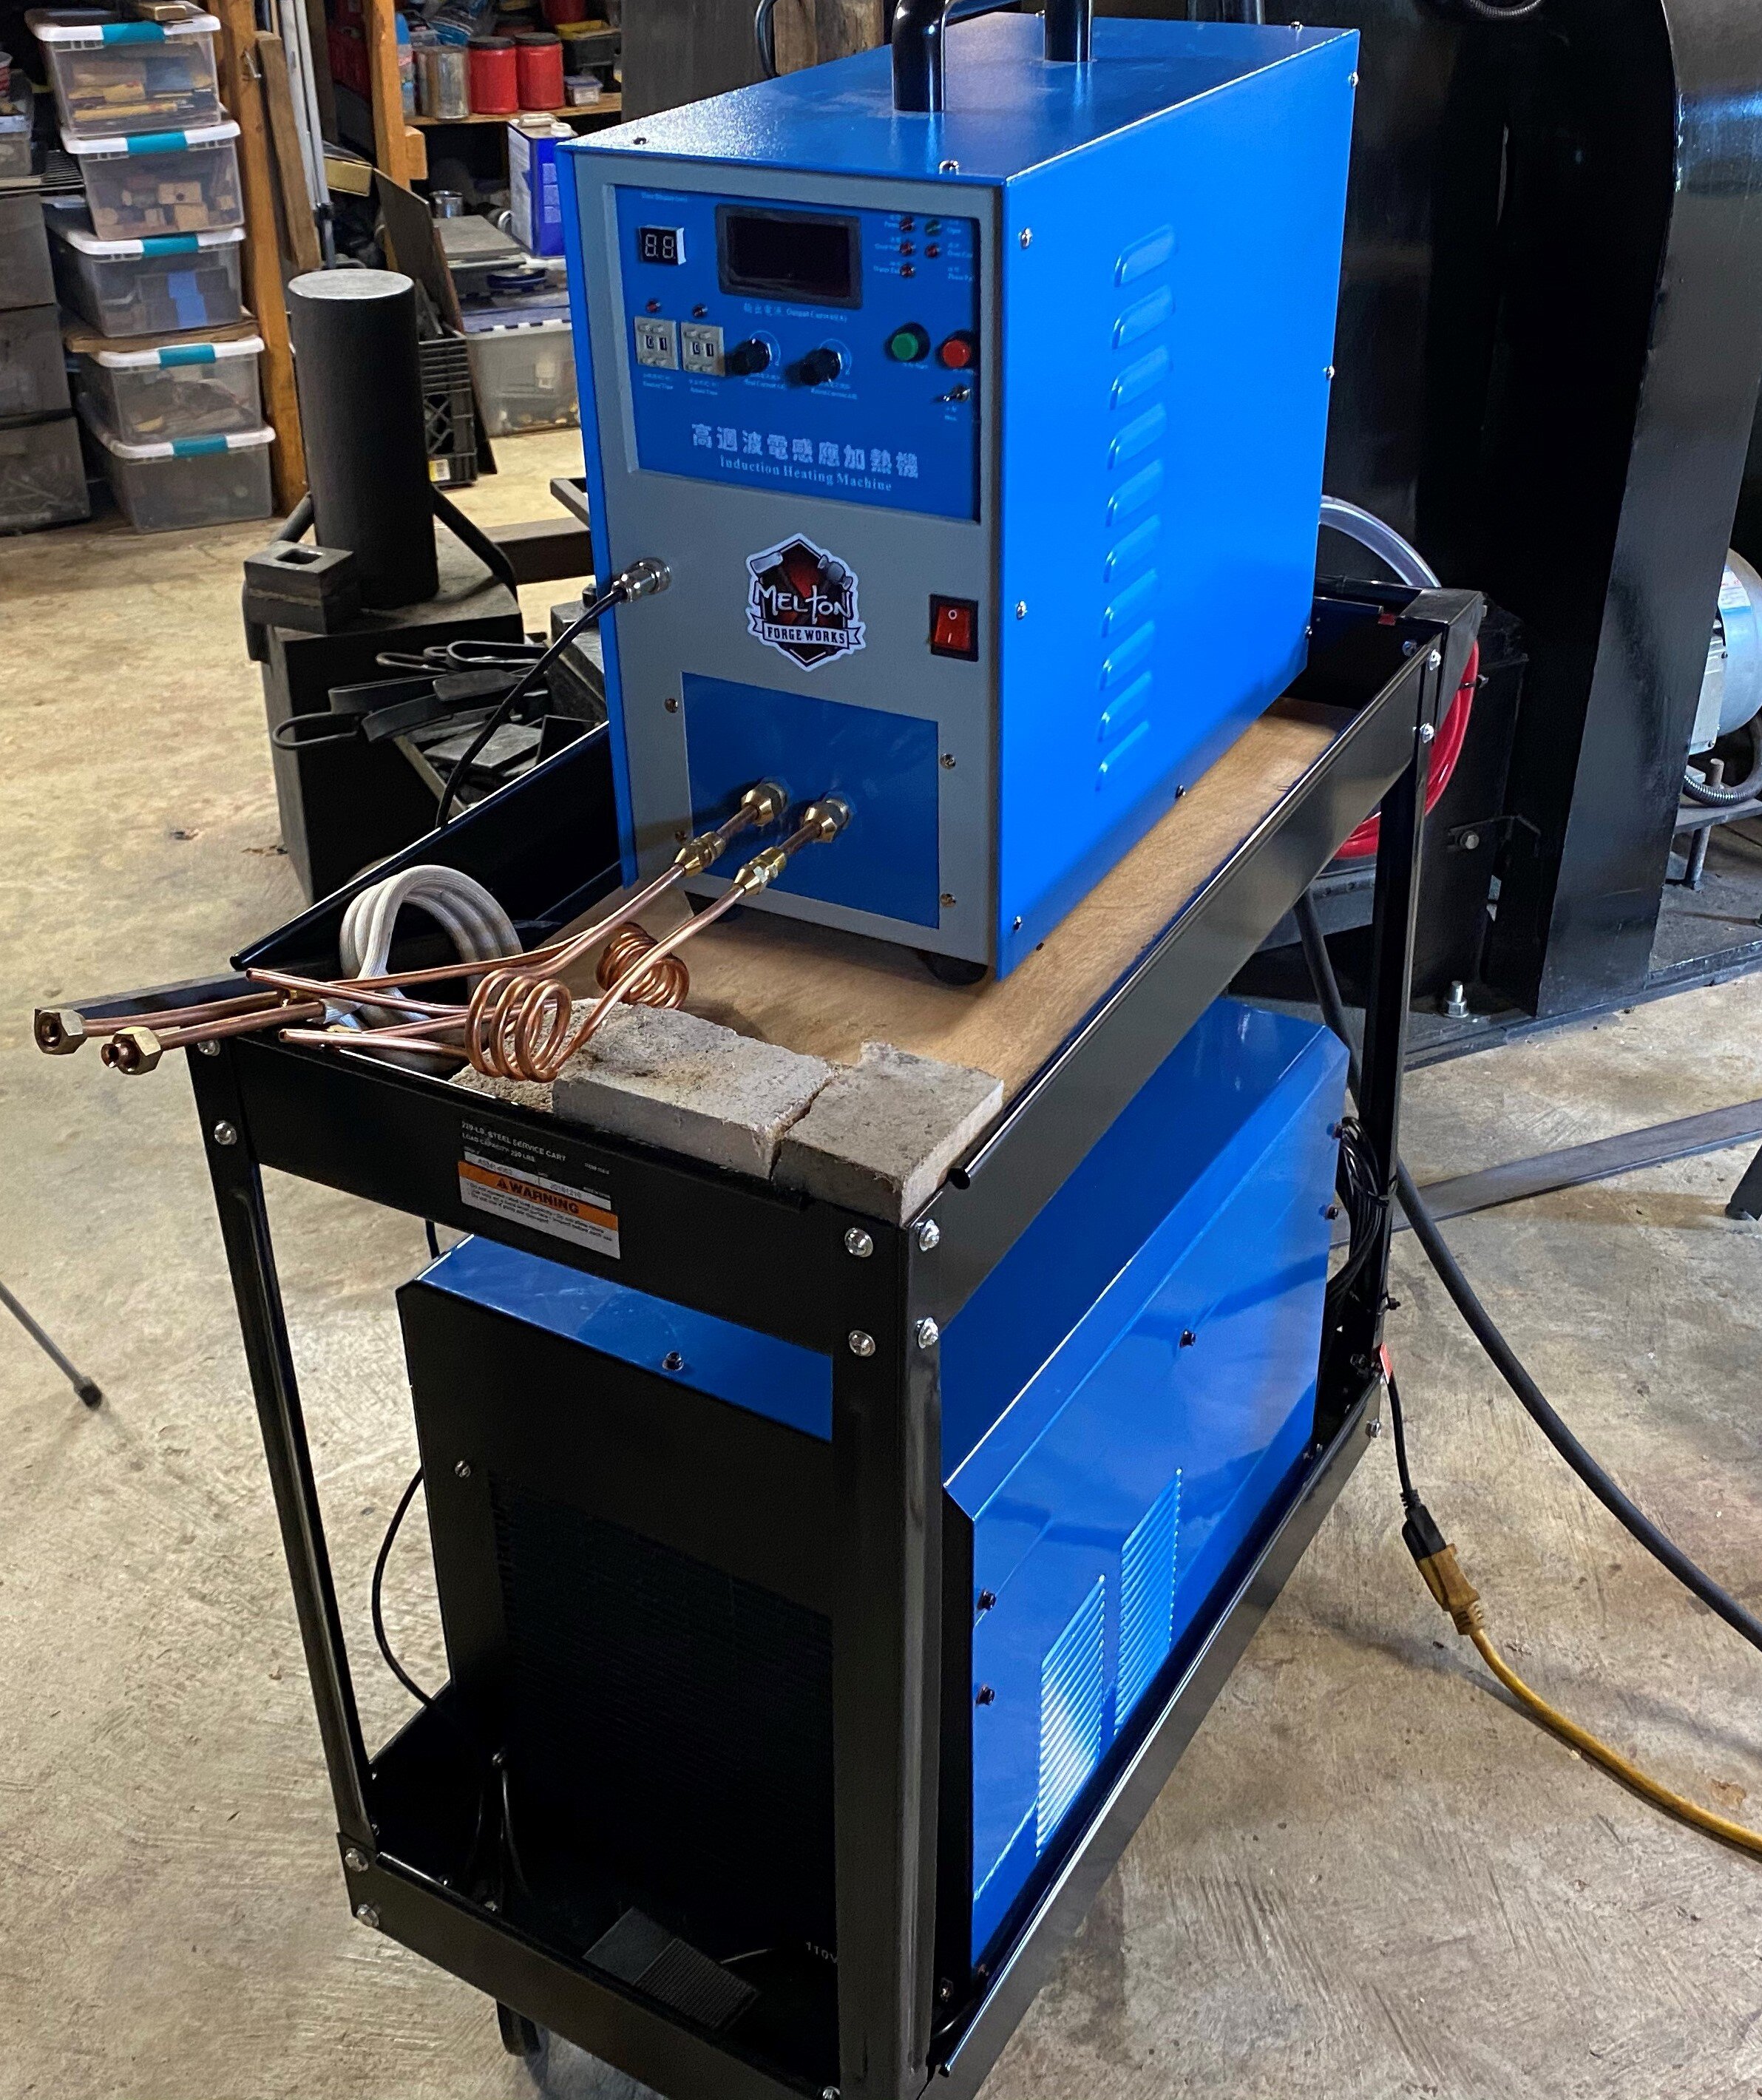
15kw Induction Machine
I purchased this one from this ebay seller, current price is $668 with free shipping as of November 2025 https://www.ebay.com/itm/266572448045
Vendors of induction machines, notably on platforms like eBay and Amazon may experience occasional stock shortages. If you encounter this, a message to the seller can sometimes expedite a restock, as has been the case for many shoppers. In instances where this isn’t fruitful, US Solid offers a viable alternative, with a price tag of $1,197 plus shipping as of November 2025. My year-long observation of sub-$700 models on eBay revealed patterns of sporadic unavailability and subsequent restocking. If US Solid's pricing is prohibitive, persistent checks on eBay or AliExpress for ‘15kw 220v induction machine’ might yield a desirable option. Numerous individuals have successfully sourced these machines from AliExpress, and even Amazon sporadically lists them. Regardless of where you purchase, my recommendation is to ensure that your chosen model is specified as 220v. While 110v models of the 15kw machines are available, the 220v variants are commonly recommended due to their superior speed, efficiency, and more economical electrical hookup requirements—typically it is more common for people to have a 220v/40amp circuit available in their shop/home as opposed to the more expensive 110v/70amp circuit that the 110v model requires! Also - there are now 2 kinds of these machines based on the ‘turns ratio,’ 16:1 or 16:2. The price differs and it seems that the 16:2 does not come in the 110v variety. As of November 2025, the 16:1 machine is around $1197 while the 16:2 machine is $1499 - see section below regarding 16:1 vs 16:2
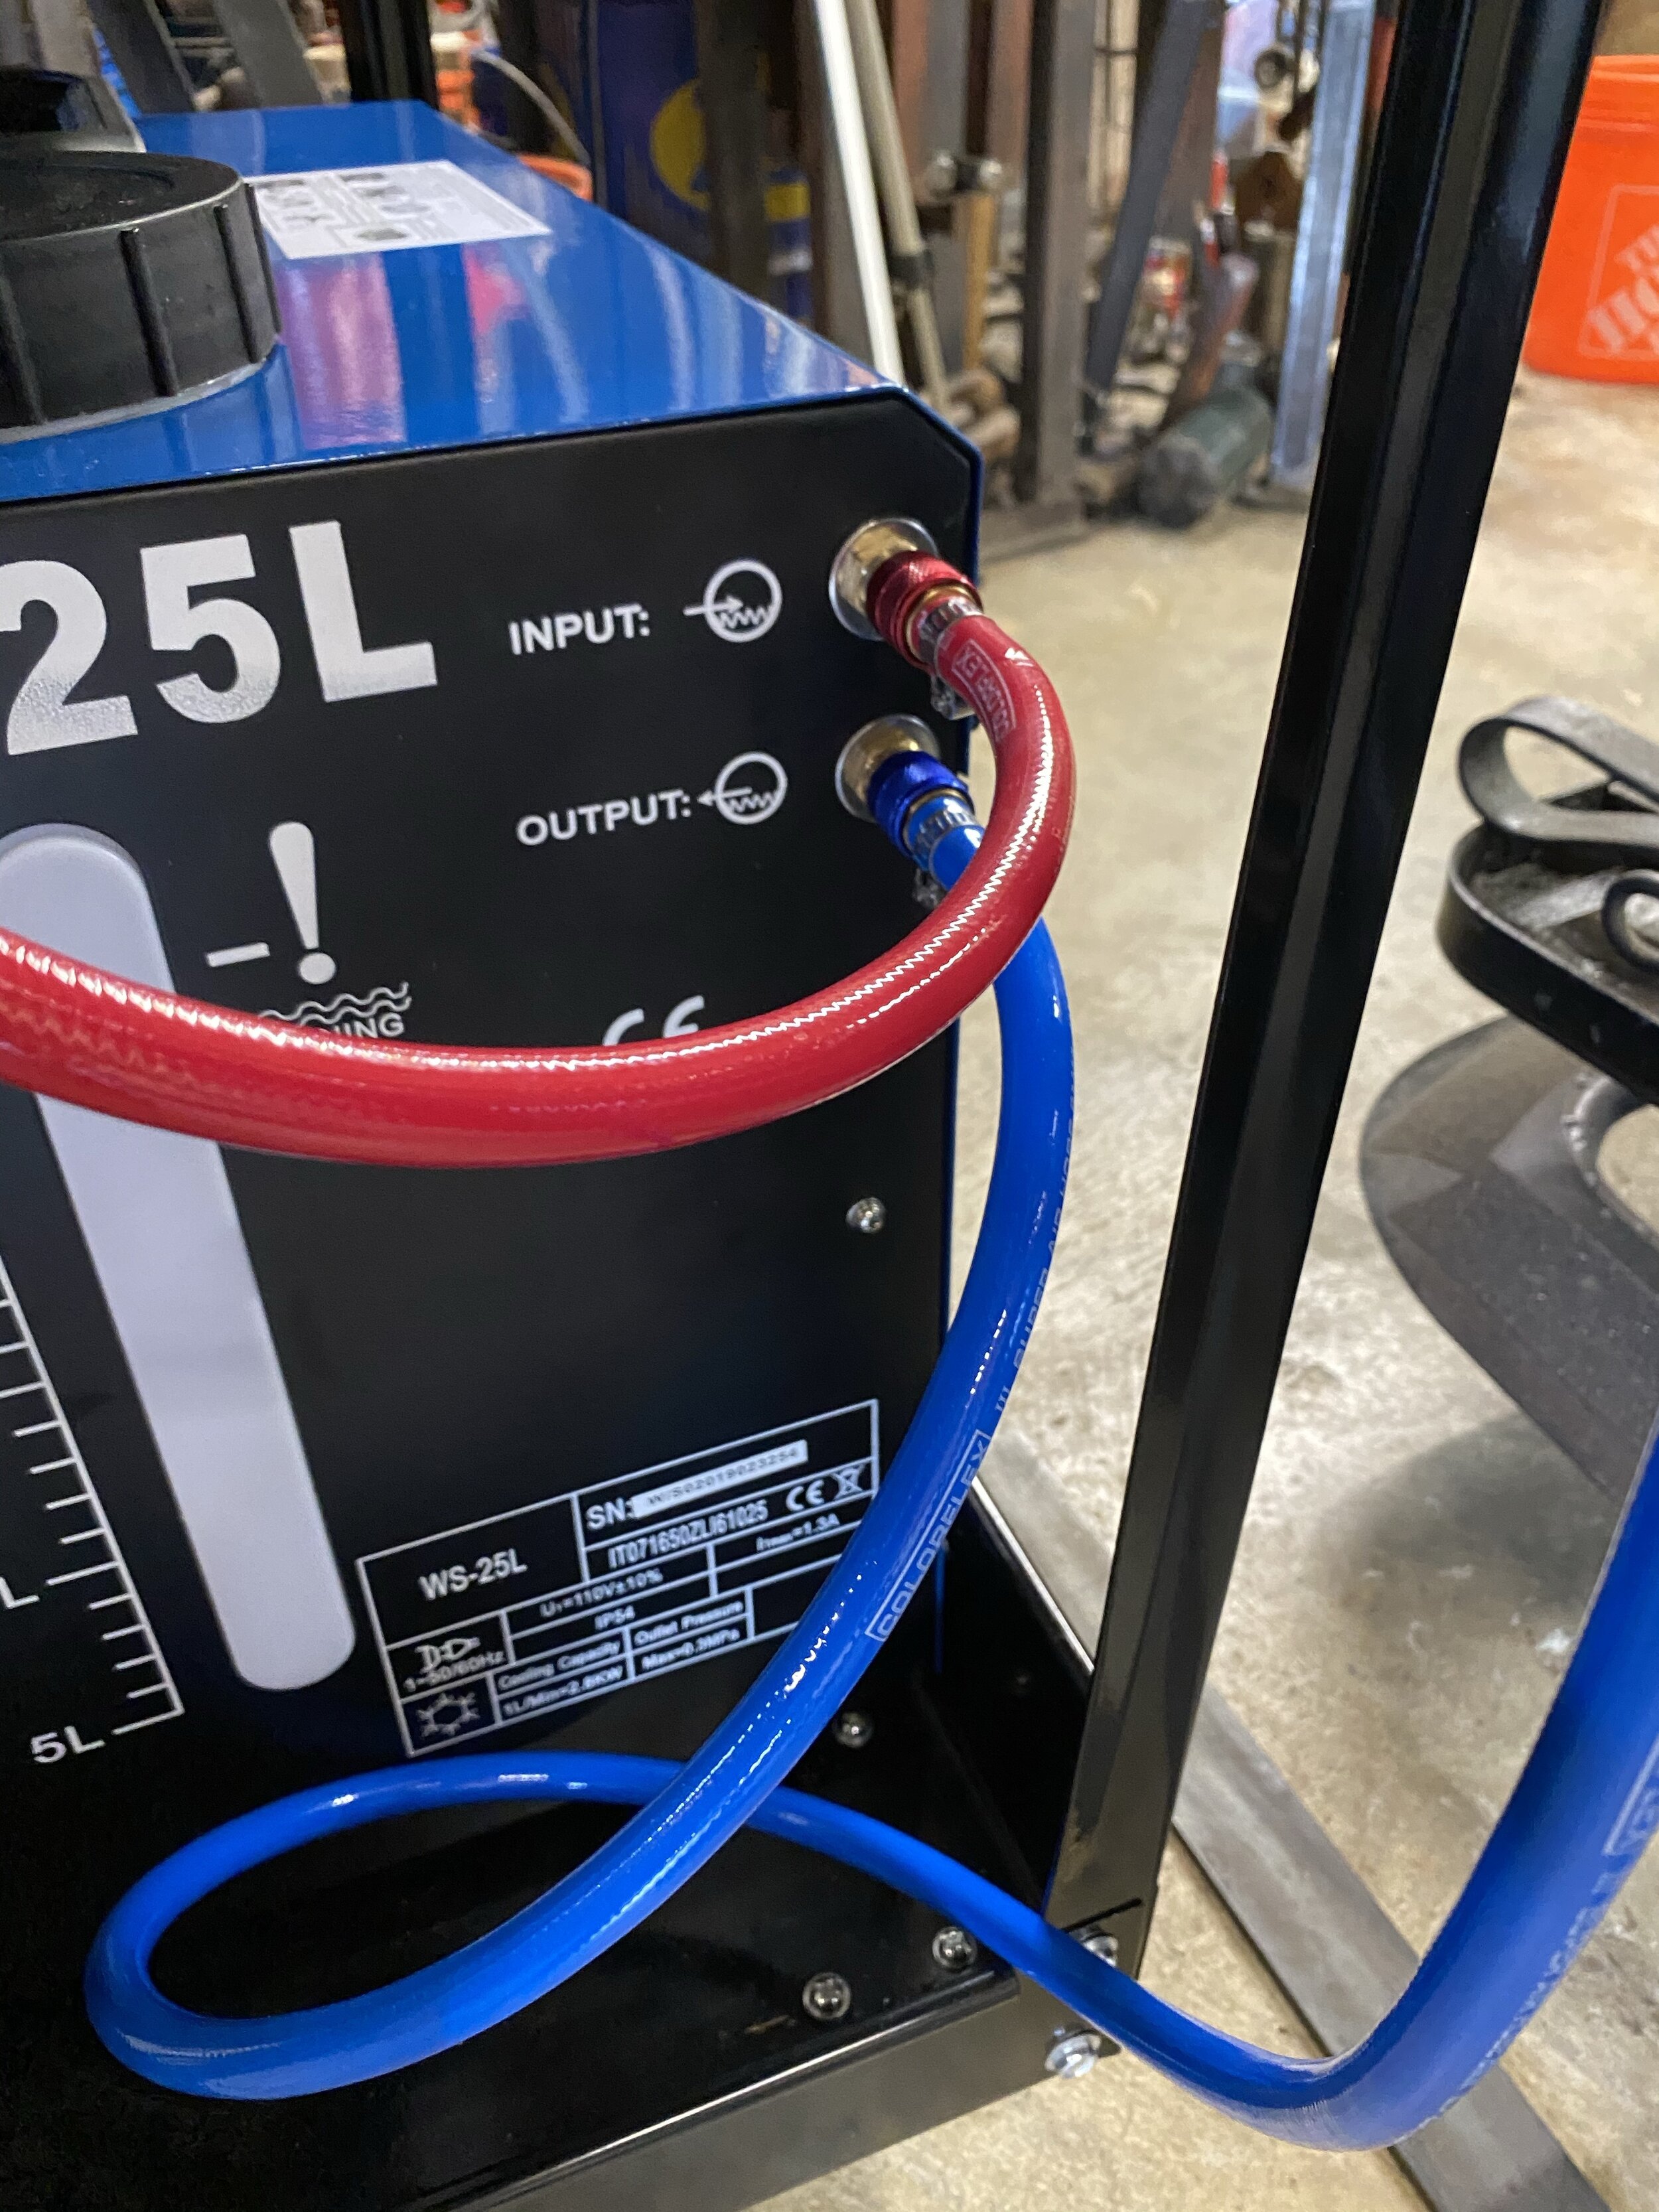
25 Liter Tig Cooler
As of December 2025 the price on the 25 has risen SIGNIFICANTLY. I think the Best Buy at the current moment is the US Solid 25L linked here, in a paint scheme that matches their induction forge. Priced at $365 as of November 2025.
Note on Availability: Similar to the induction machine, the 25L Tig Cooler experiences periodic sell-outs on eBay but is typically replenished within a month. Alternatively, AliExpress has proven to be a reliable source for this unit during eBay's out-of-stock periods.
NOTICE:
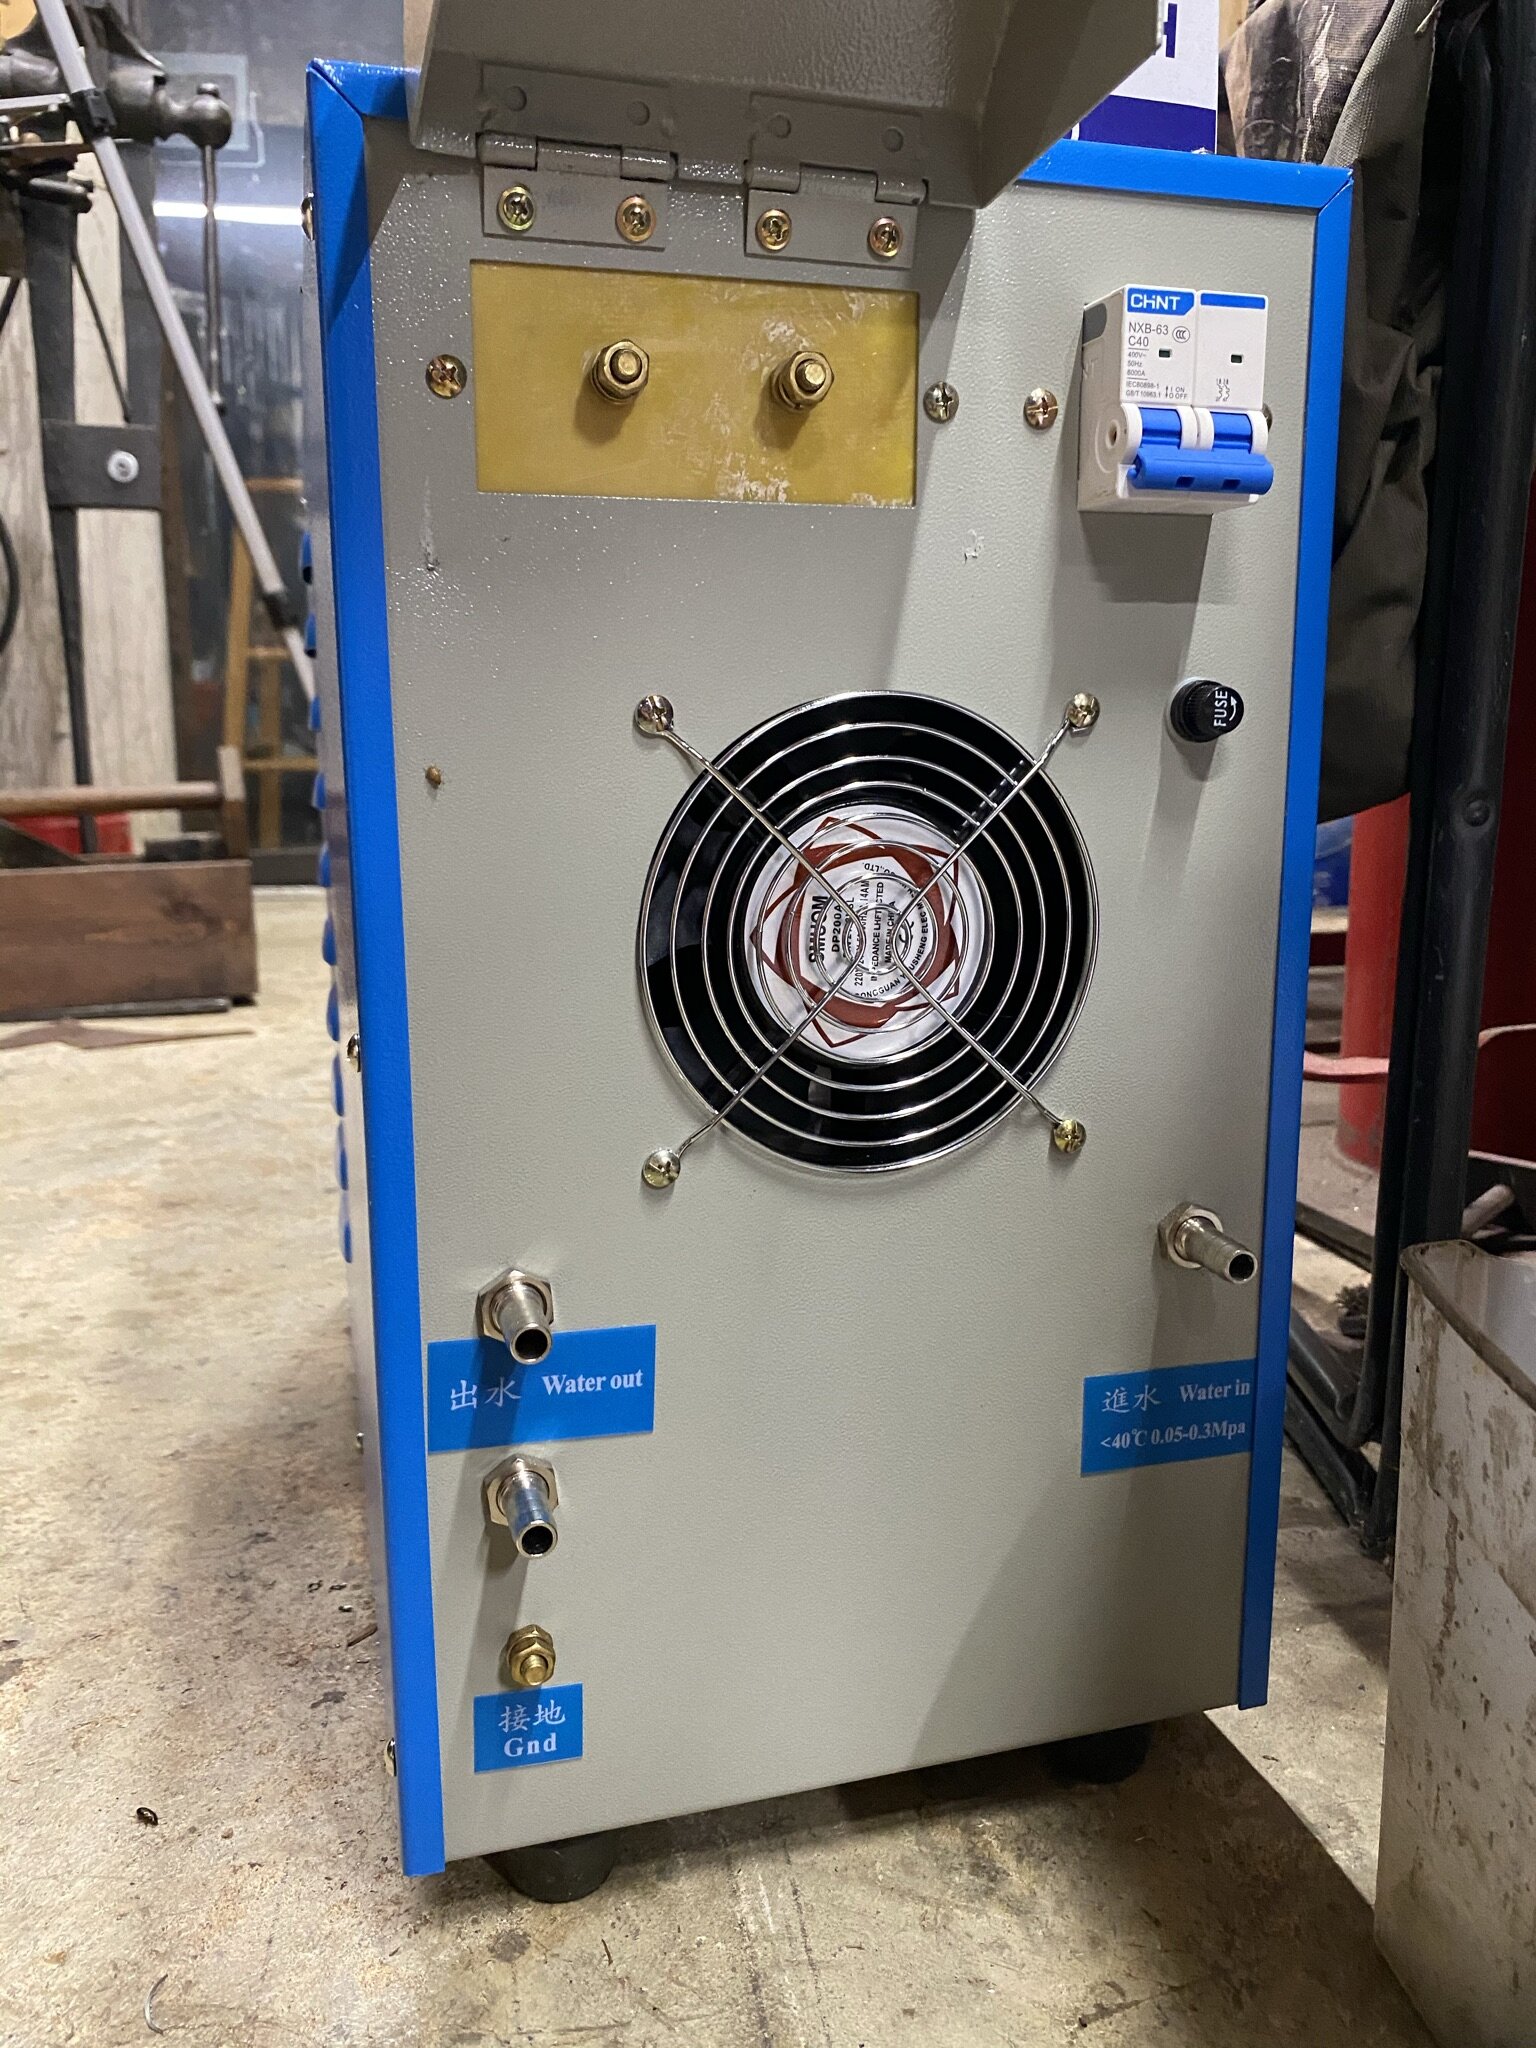
Several users of the 25L Tig Cooler have reported initial challenges with fuses blowing. A common resolution has been found by replacing the original fuse with a 6amp version. I would suggest that when you buy a tig cooler, go ahead and get a few additional 6amp fuses alongside the cooler just to be on the safe side. This problem seems to occur due to a slight surge just above 5a upon startup, which could be the culprit behind the initial fuse blowouts.
Additional Supplies and Cost Estimations
When assembling your induction machine, a few extra parts and supplies will be needed. Please note, the prices provided below are based on my own purchases in 2020 and are meant to serve merely as a rough estimate; actual costs will likely vary based on your location and current market conditions. Given the potential for fluctuation and regional disparities in pricing, these prices will not be routinely updated here but should assist in initial cost estimation.
Electrical supplies
20ft of 10 gauge, 3-strand flexible electrical wire - $45
40-amp double pole breaker $10
Small junction box $2
10-12 awg shrink fit ring terminals $5
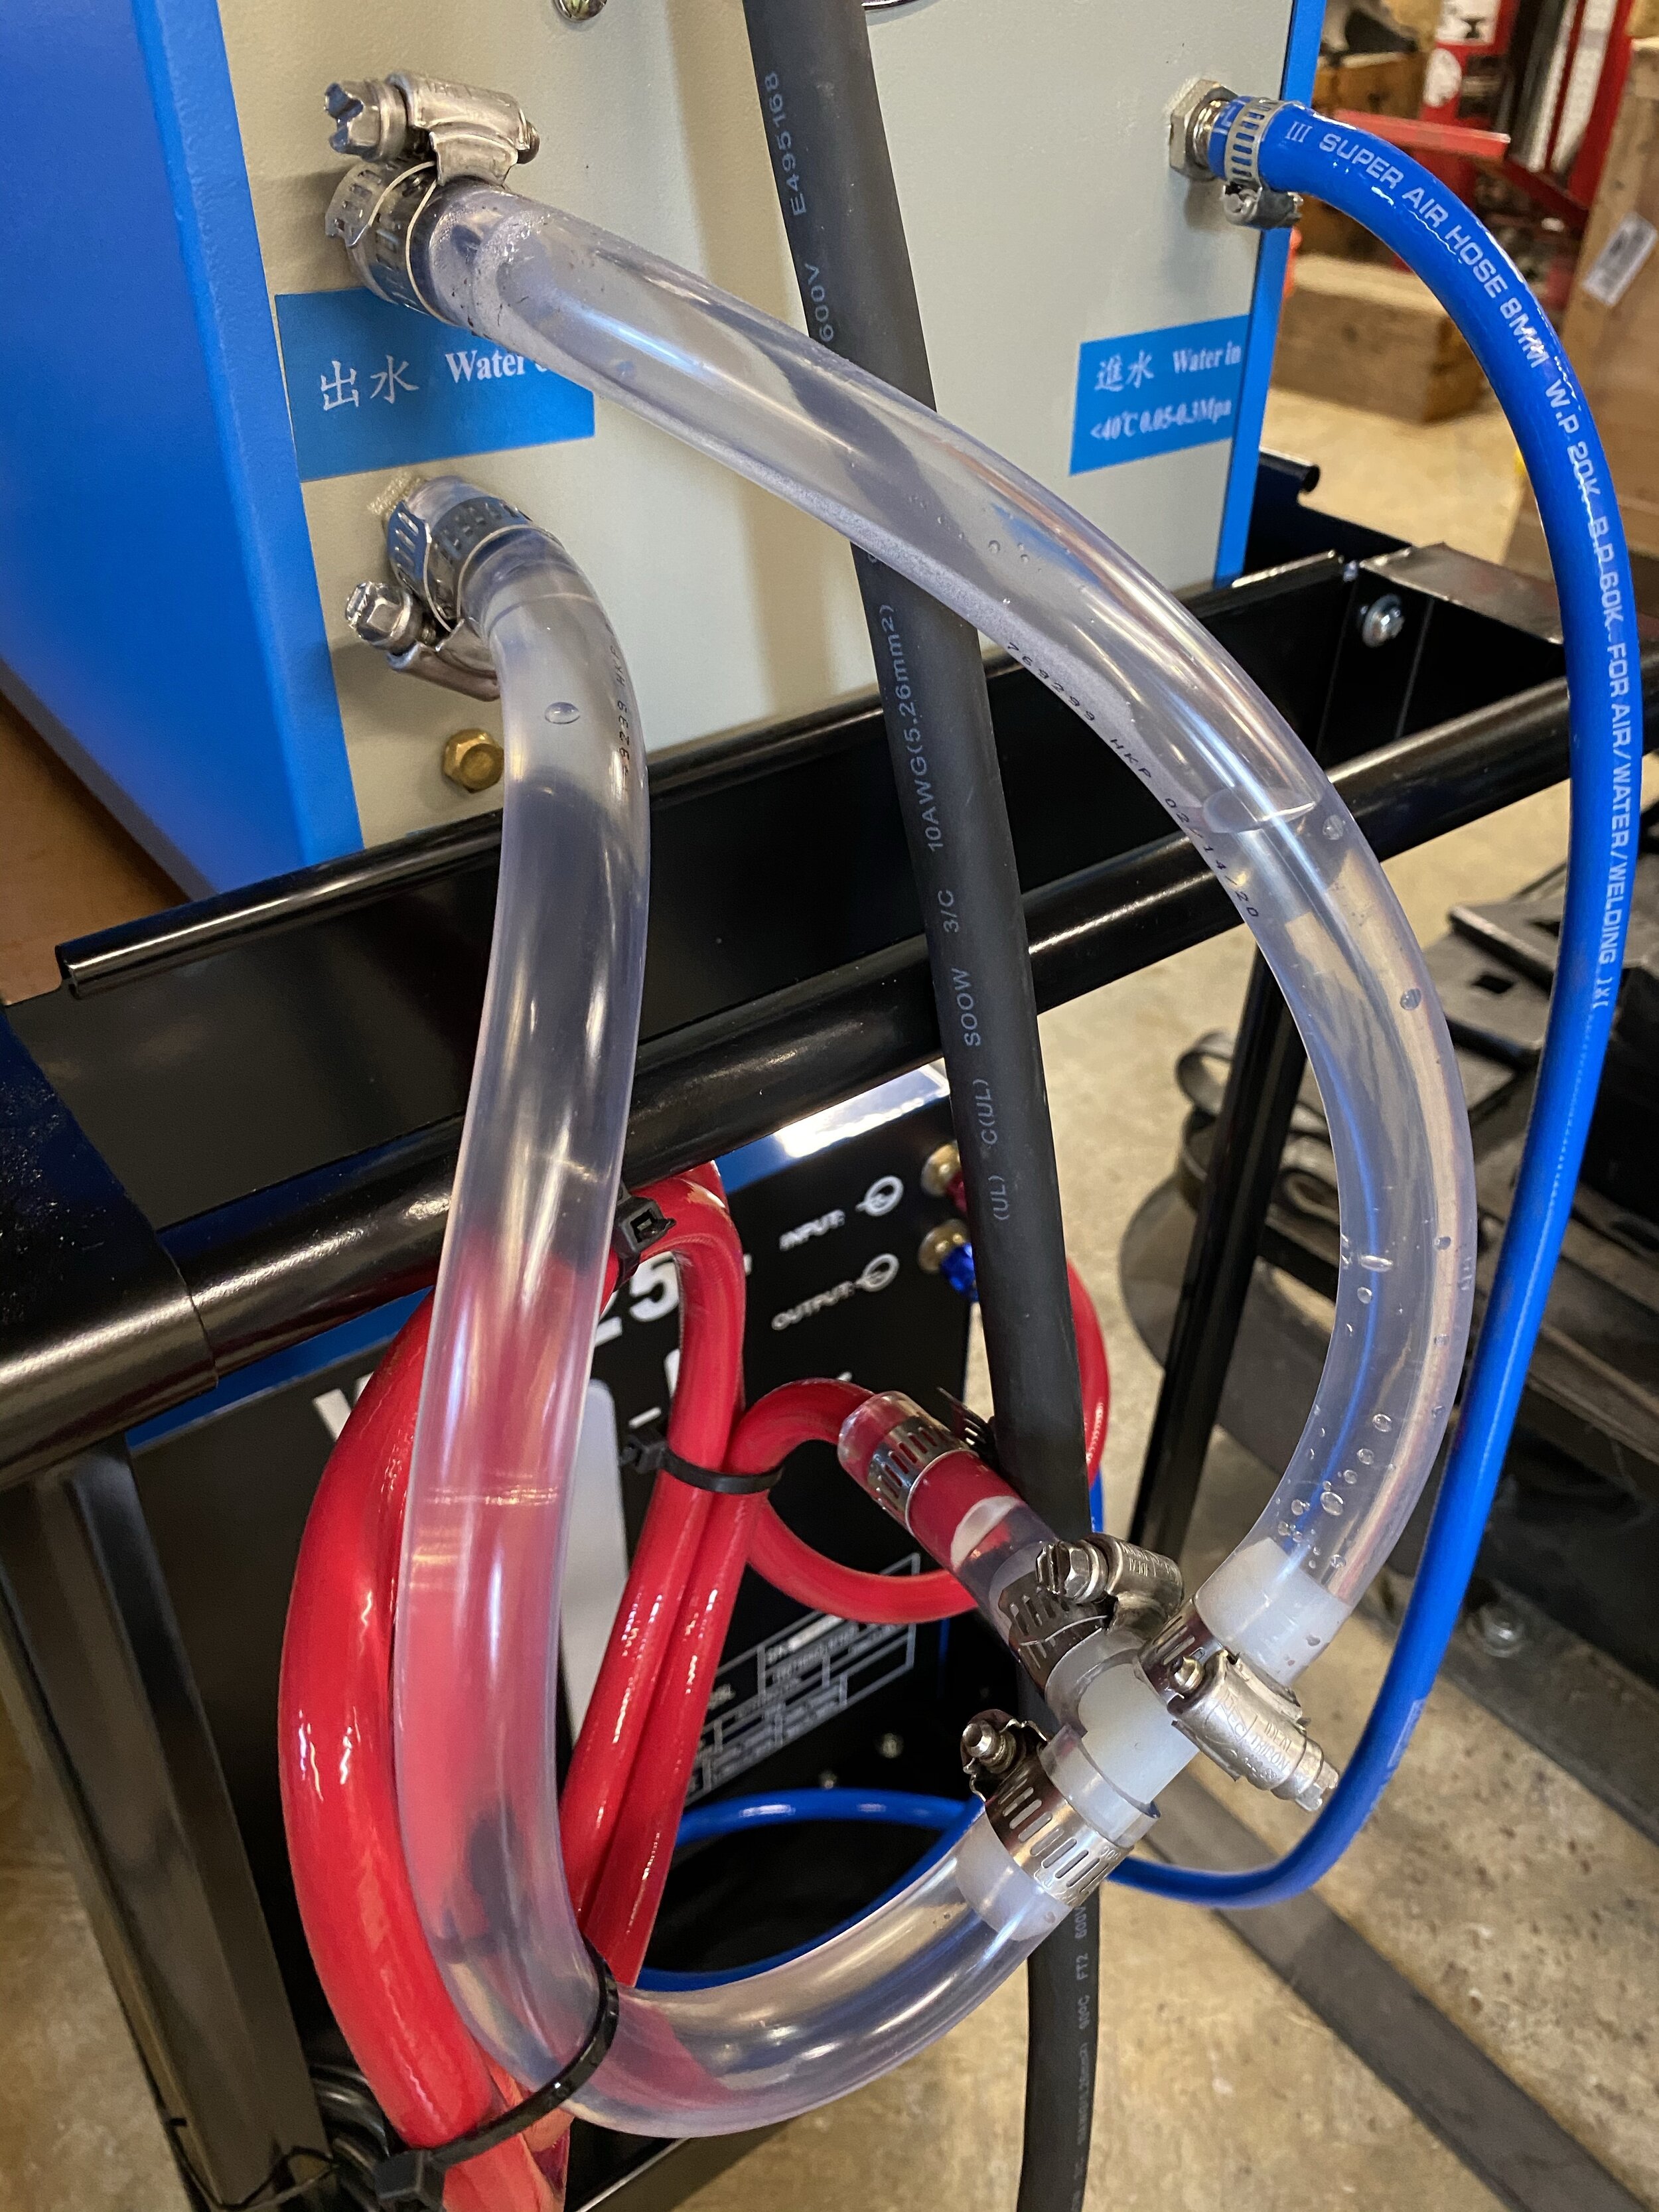
Plumbing (Some of this hose ended up not being necessary since I used the blue and red hose that came with the Tig cooler.)
3/8 in. I.D. x 1/2 in. O.D. x 10 ft. Clear Vinyl Tubing $6
1/2 in. I.D. x 5/8 in. O.D. x 20 ft. Clear Vinyl Tubing $10
Hose clamps (12) $12
Materials for making coils
1/4 in. O.D. x 50 ft. Soft Copper Refrigeration Coil Tubing $61 (for making coils)
Copper tubing cutter $10
Copper tubing flaring kit $30
1/4 in. Flare Brass Nut Fittings (4) $8
1lb of ⅛ Solid wire Solder $15
Paste Flux for soldering copper tubing $5
1/4-in Threaded Flare x MIP Adapter Union Fittings (2) $5 (for making the 8mm to ¼ coil adapters)
Miscellaneous
6 Gallons of Distilled water $12
Steel tool cart $50
Small nuts and bolts to hold the junction box to the case .50c
Modifications I have made to my DIY Machine
Cleaned up the wiring
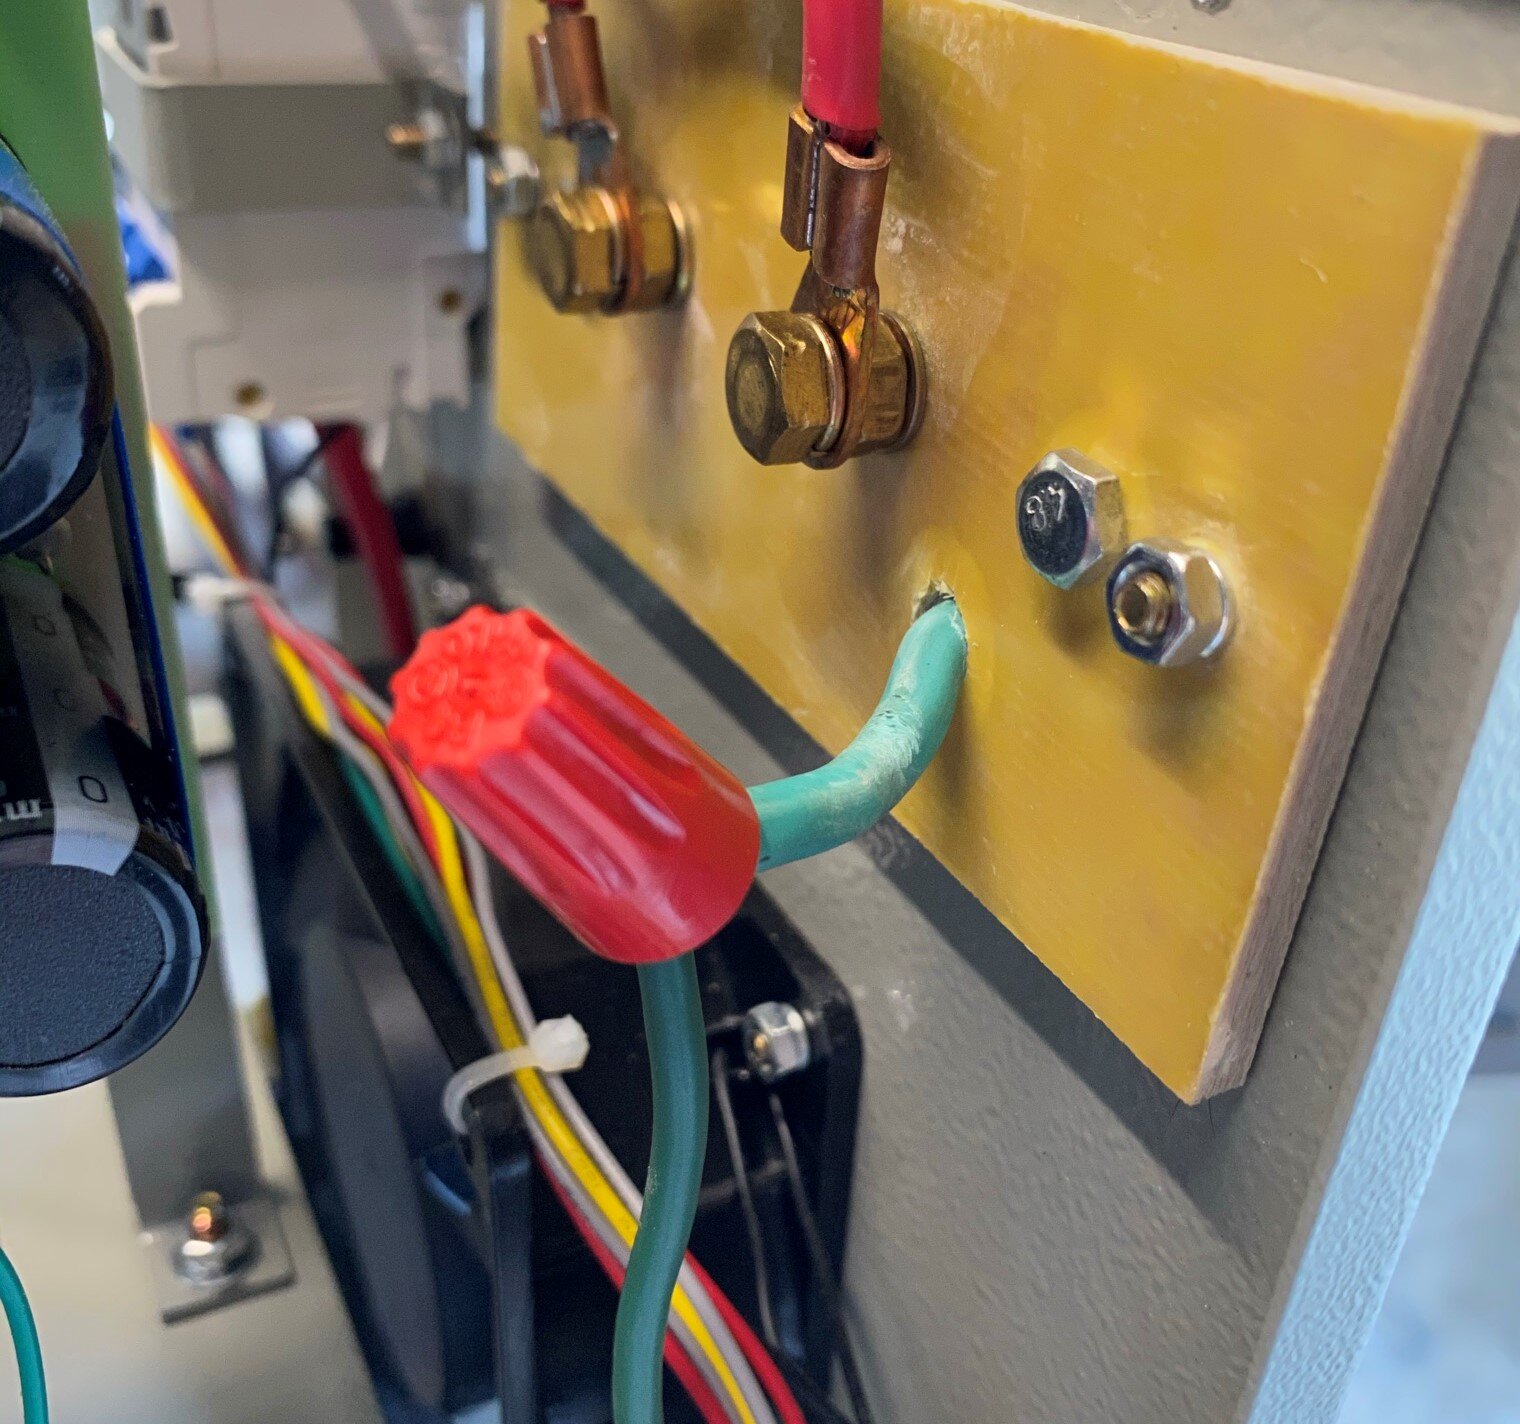
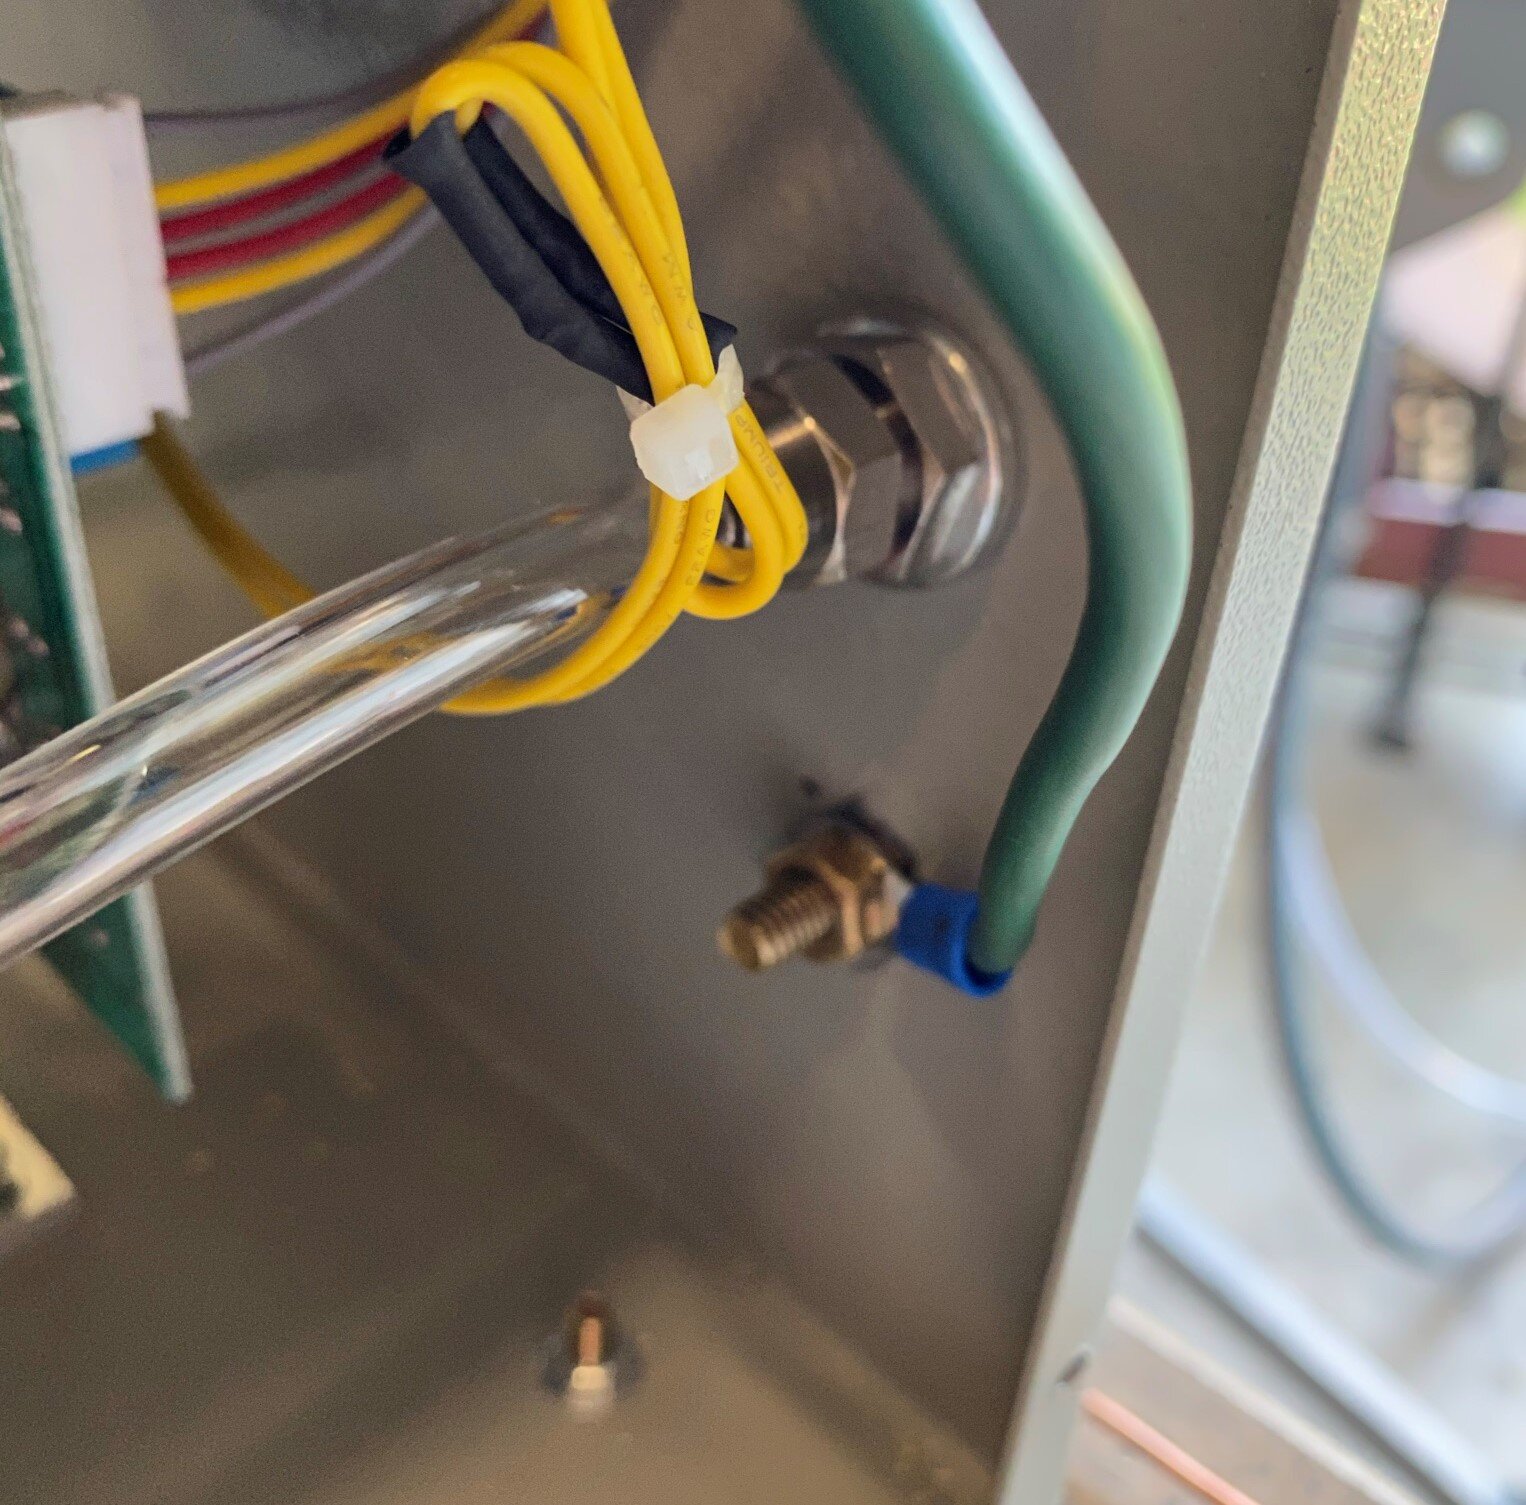
The wiring terminals and ground connection on many of these induction heaters are exposed and ridiculously dangerous. On my own machine, the ground connection was located at the bottom of the back of the unit, just below the water output ports, while the 220v terminals were situated at the top under an open lid. In my opinion, this MUST be addressed to improve safety. To do this, I added a small junction box with strain relief for the main wire and rerouted the ground wire inside the case. I also used shrink-fit ring terminals to attach the wires inside the box, which required drilling three holes in the yellow micarta plate that the main terminals were connected to. One of these holes was for the junction box, and the other two were for the ground wire. Currently, I have a conduit connector on the box, but I plan to replace it with a proper cable clamp for strain relief.

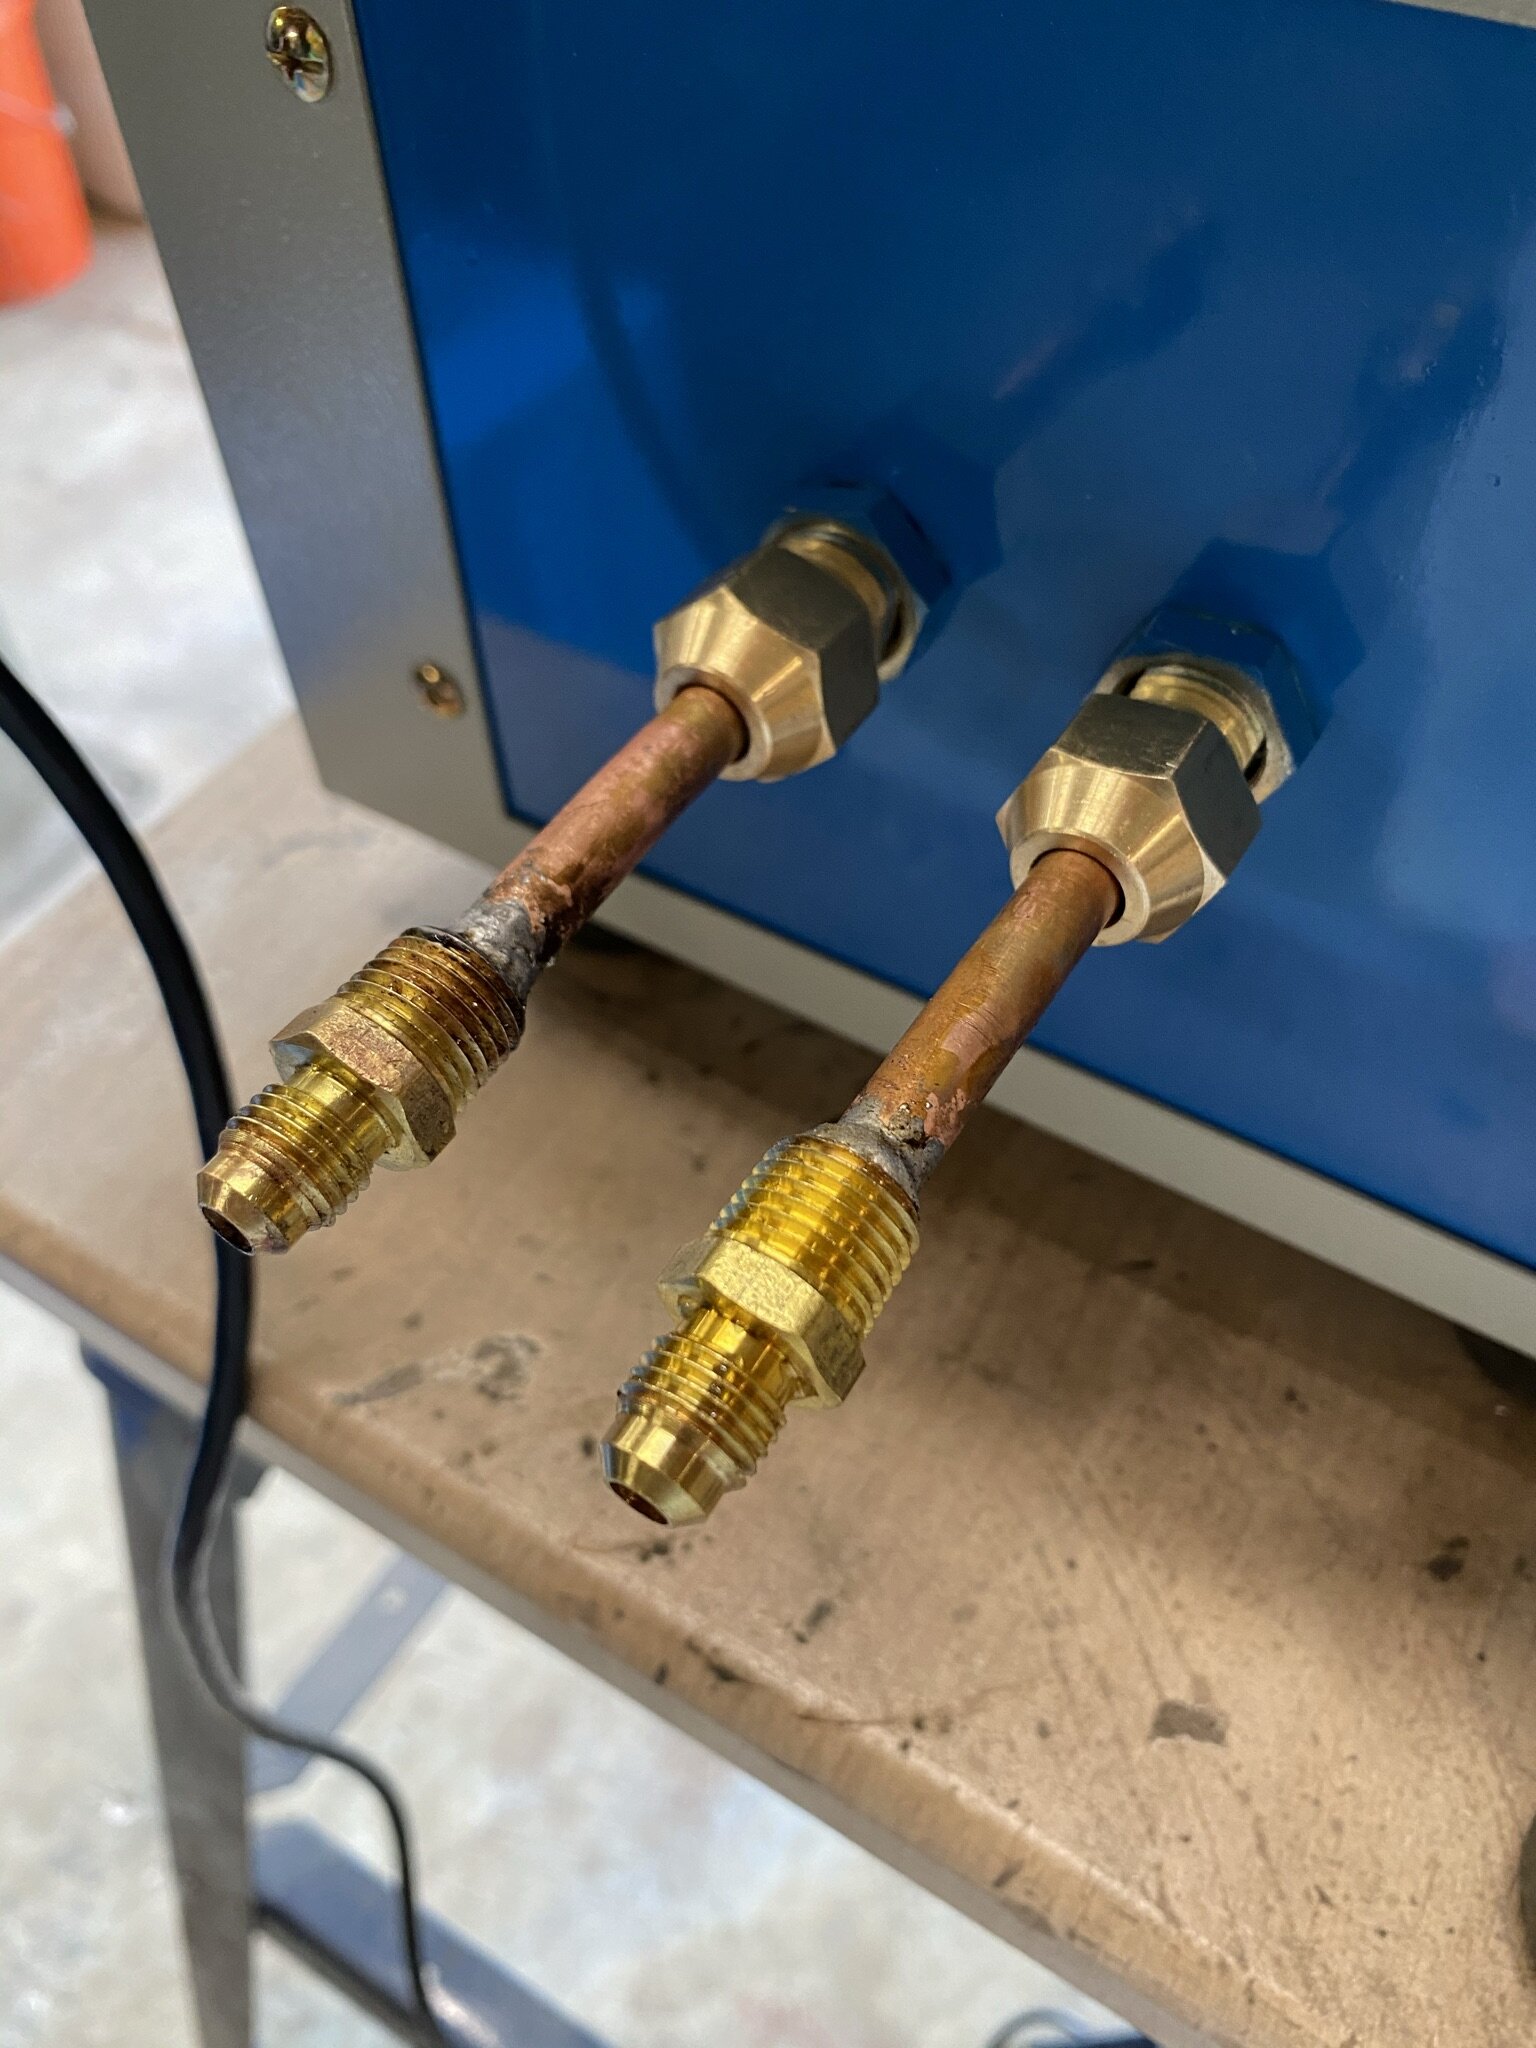
Made an 8mm to 1/4 inch tubing adapter
You will likely want to make your own coils so if you’re in the USA you'll want to adapt the machine to use ¼ inch tubing and fittings. The machine comes with 8mm tubing and 14mm nuts for the coils. Those metric components are difficult to find here in the US, so I simply made an adapter using short sections of the original 8mm tubing soldered to ¼ inch adapters. (See pic below) This allows me to use standard, off the shelf parts from a local hardware store to make my own coils. I used two 1/4-inch short flare nuts and two 1/4-inch flare adapters. Mettle Works has these metric parts for sale if you do not want to make your own 1/4-inch adapters, see link section below. I have noticed recently that US Solid is now carrying 8mm tubing if you want to use it to make adapters or coils.
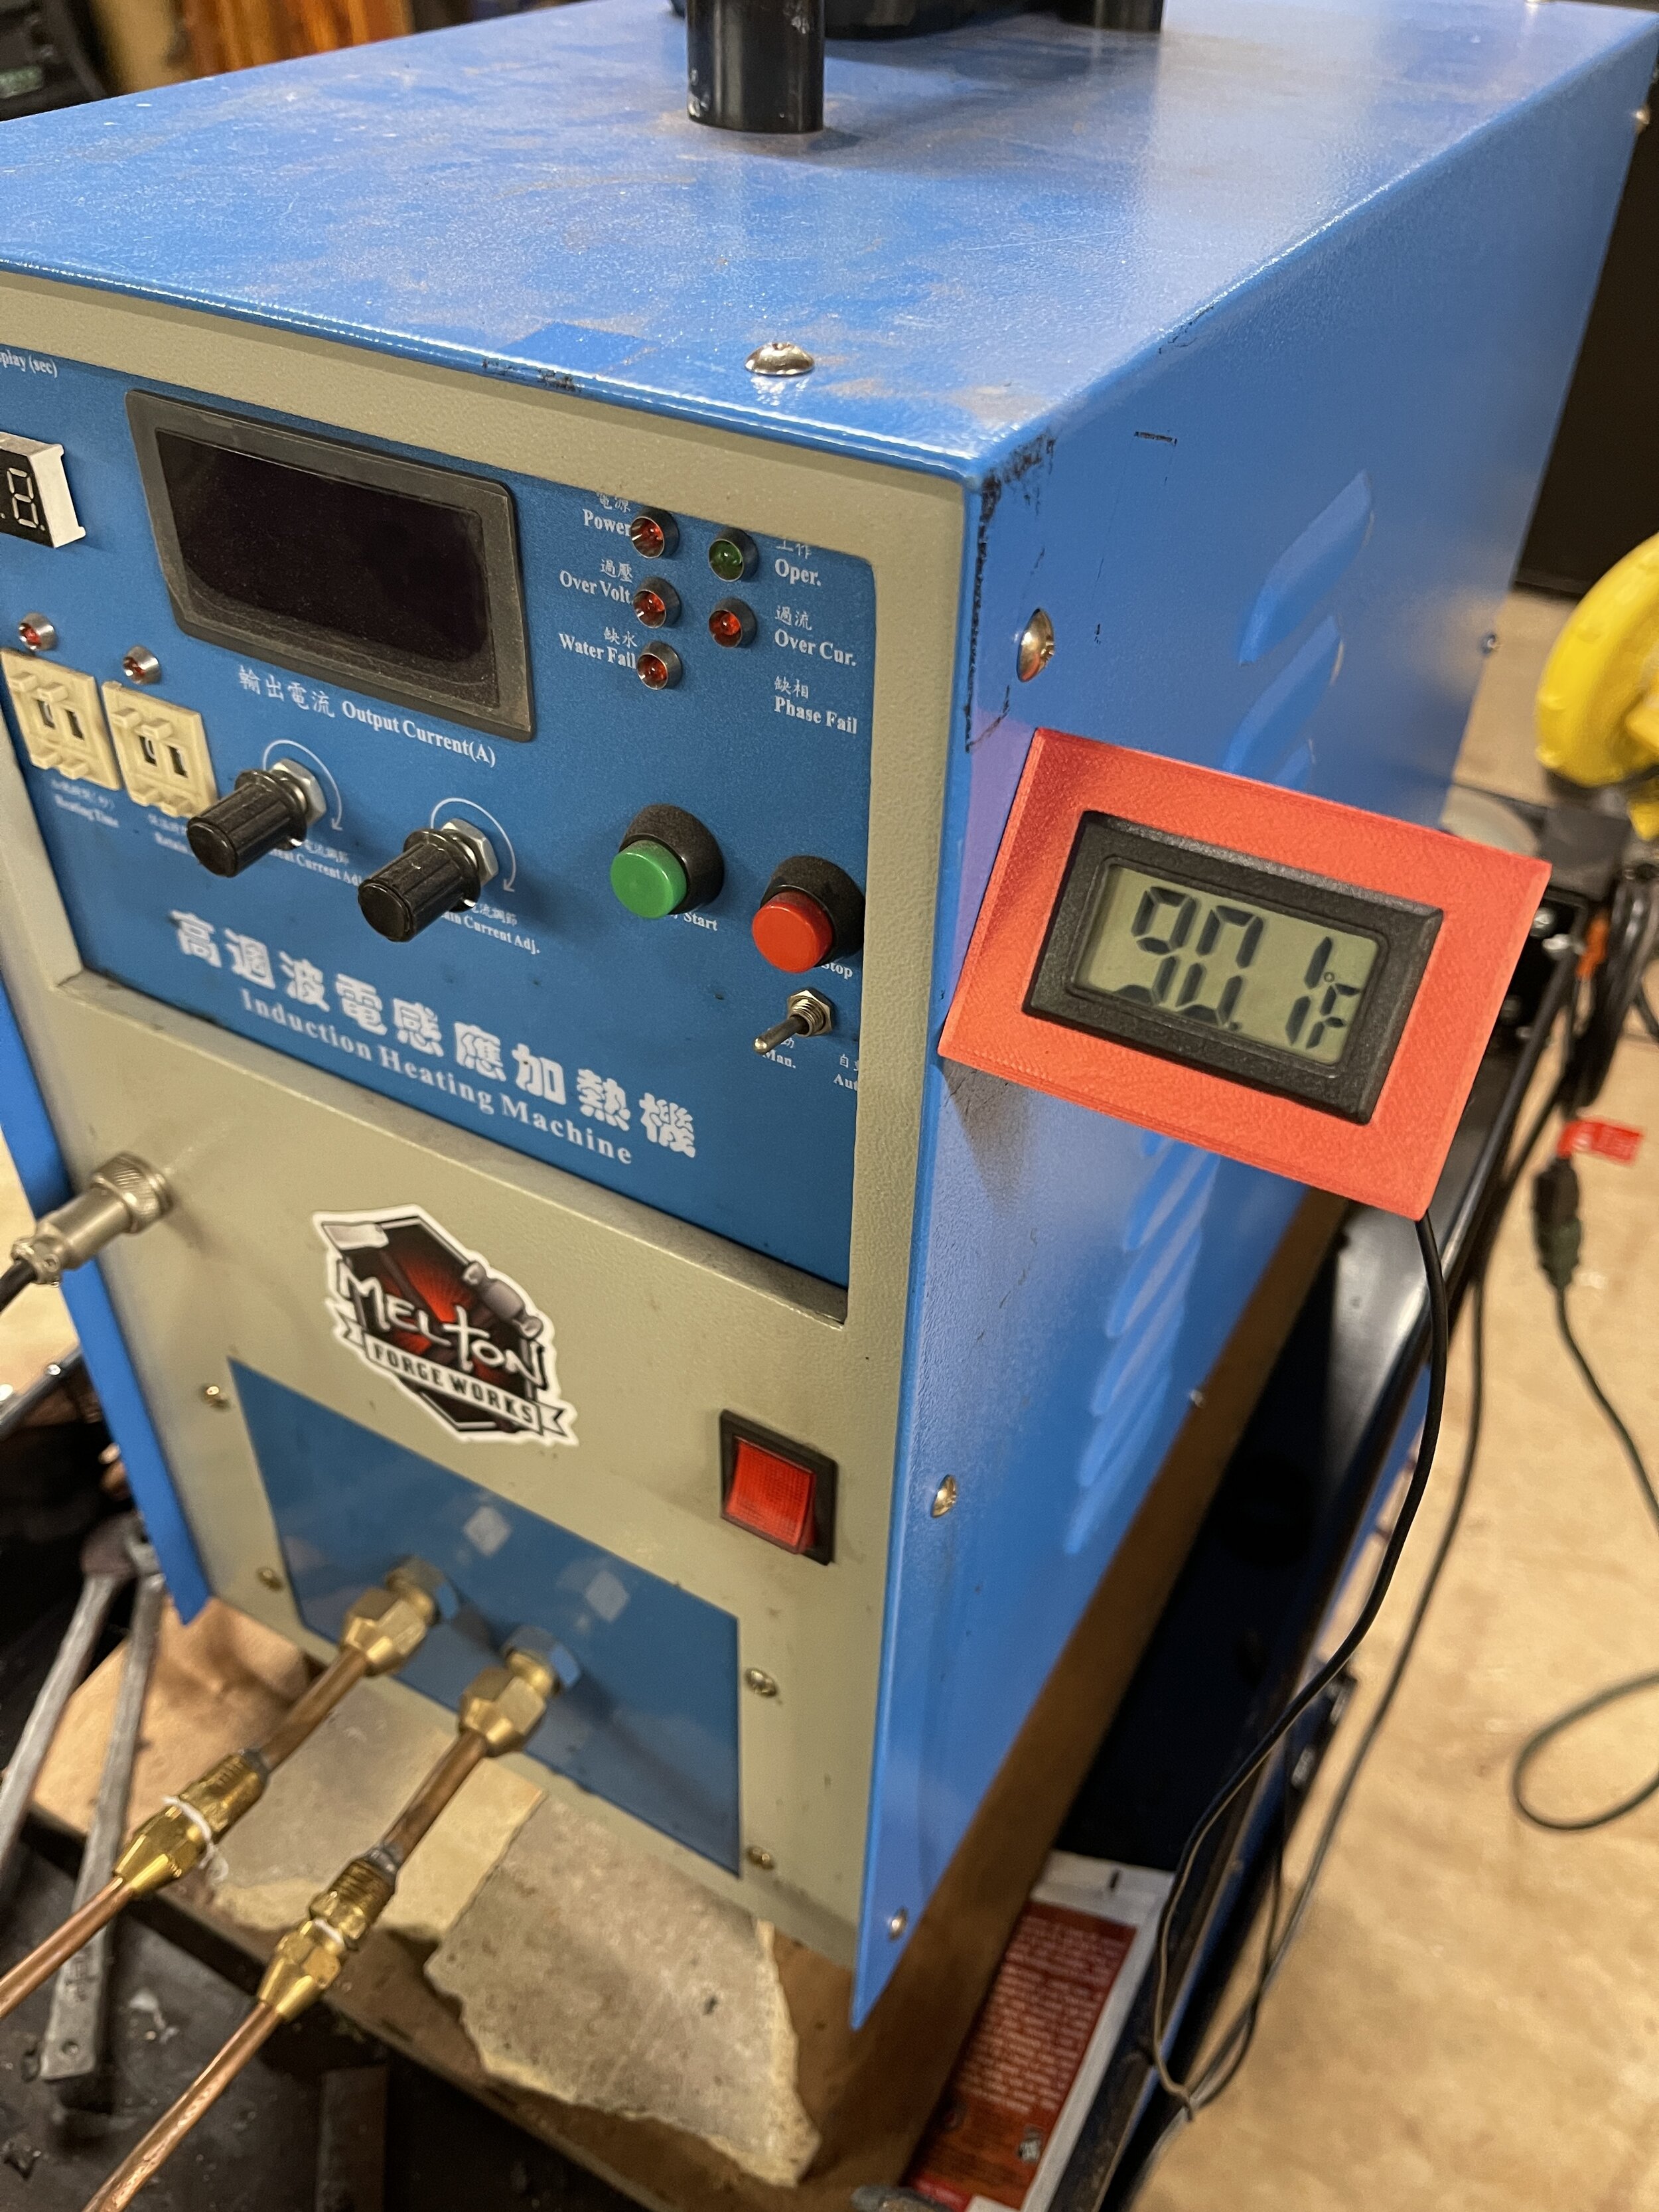
Added a water temperature sensor
I purchased the following Aquarium thermometer to monitor the water temperature in the Tig cooler: Amazon.com: Digital LCD Thermometer Temperature Gauge Aquarium Thermometer with Probe
I mounted it to the induction forge and can see the water temp easily while forging. So far, I have not seen the temperature rise anywhere near the 130 degrees that would cause a water-fail condition. I also designed a simple 3D printed magnetic mount for this thermometer; it has places for small 3mmx6mm rare earth magnets so you can stick it to the side of the induction machine. The STL can be found here on Thingiverse. If you’d like one of these 3D printed magnetic mounts and you don’t have a 3D printer just shoot me an email, I will be happy to print one for you, with included magnets, and send it to you for a few bucks, mainly to cover shipping costs.
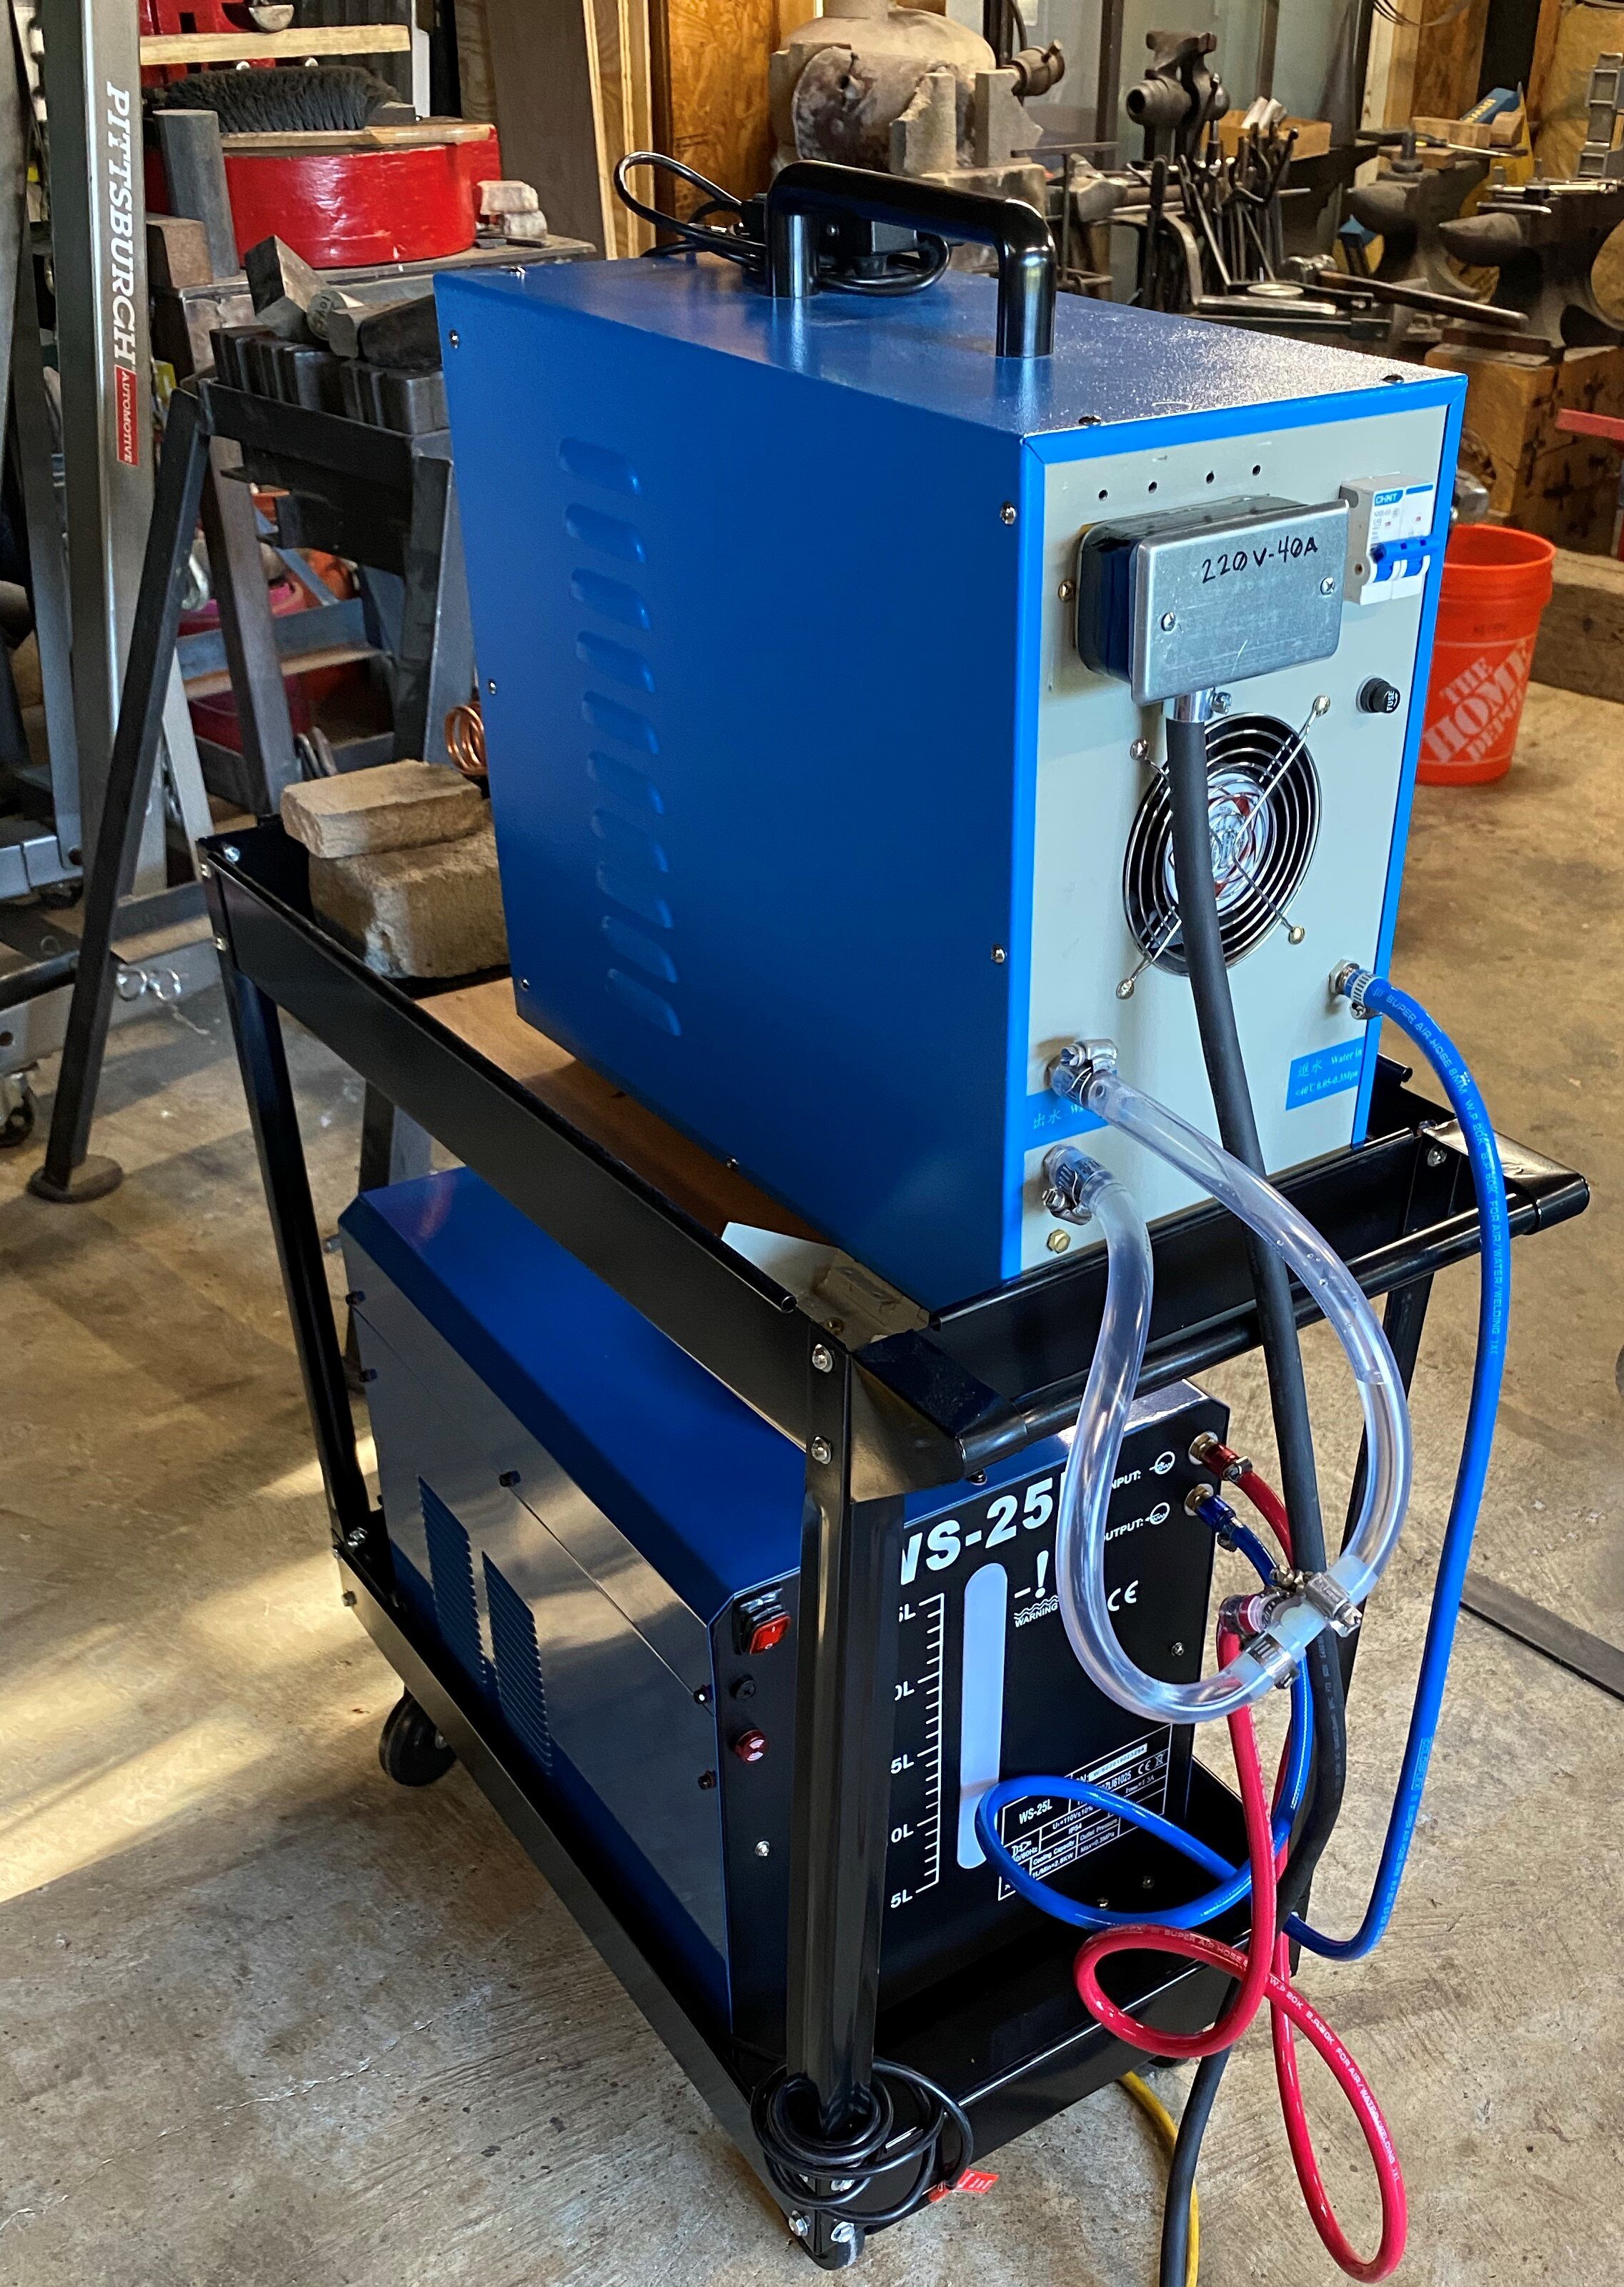
Regarding Cooling
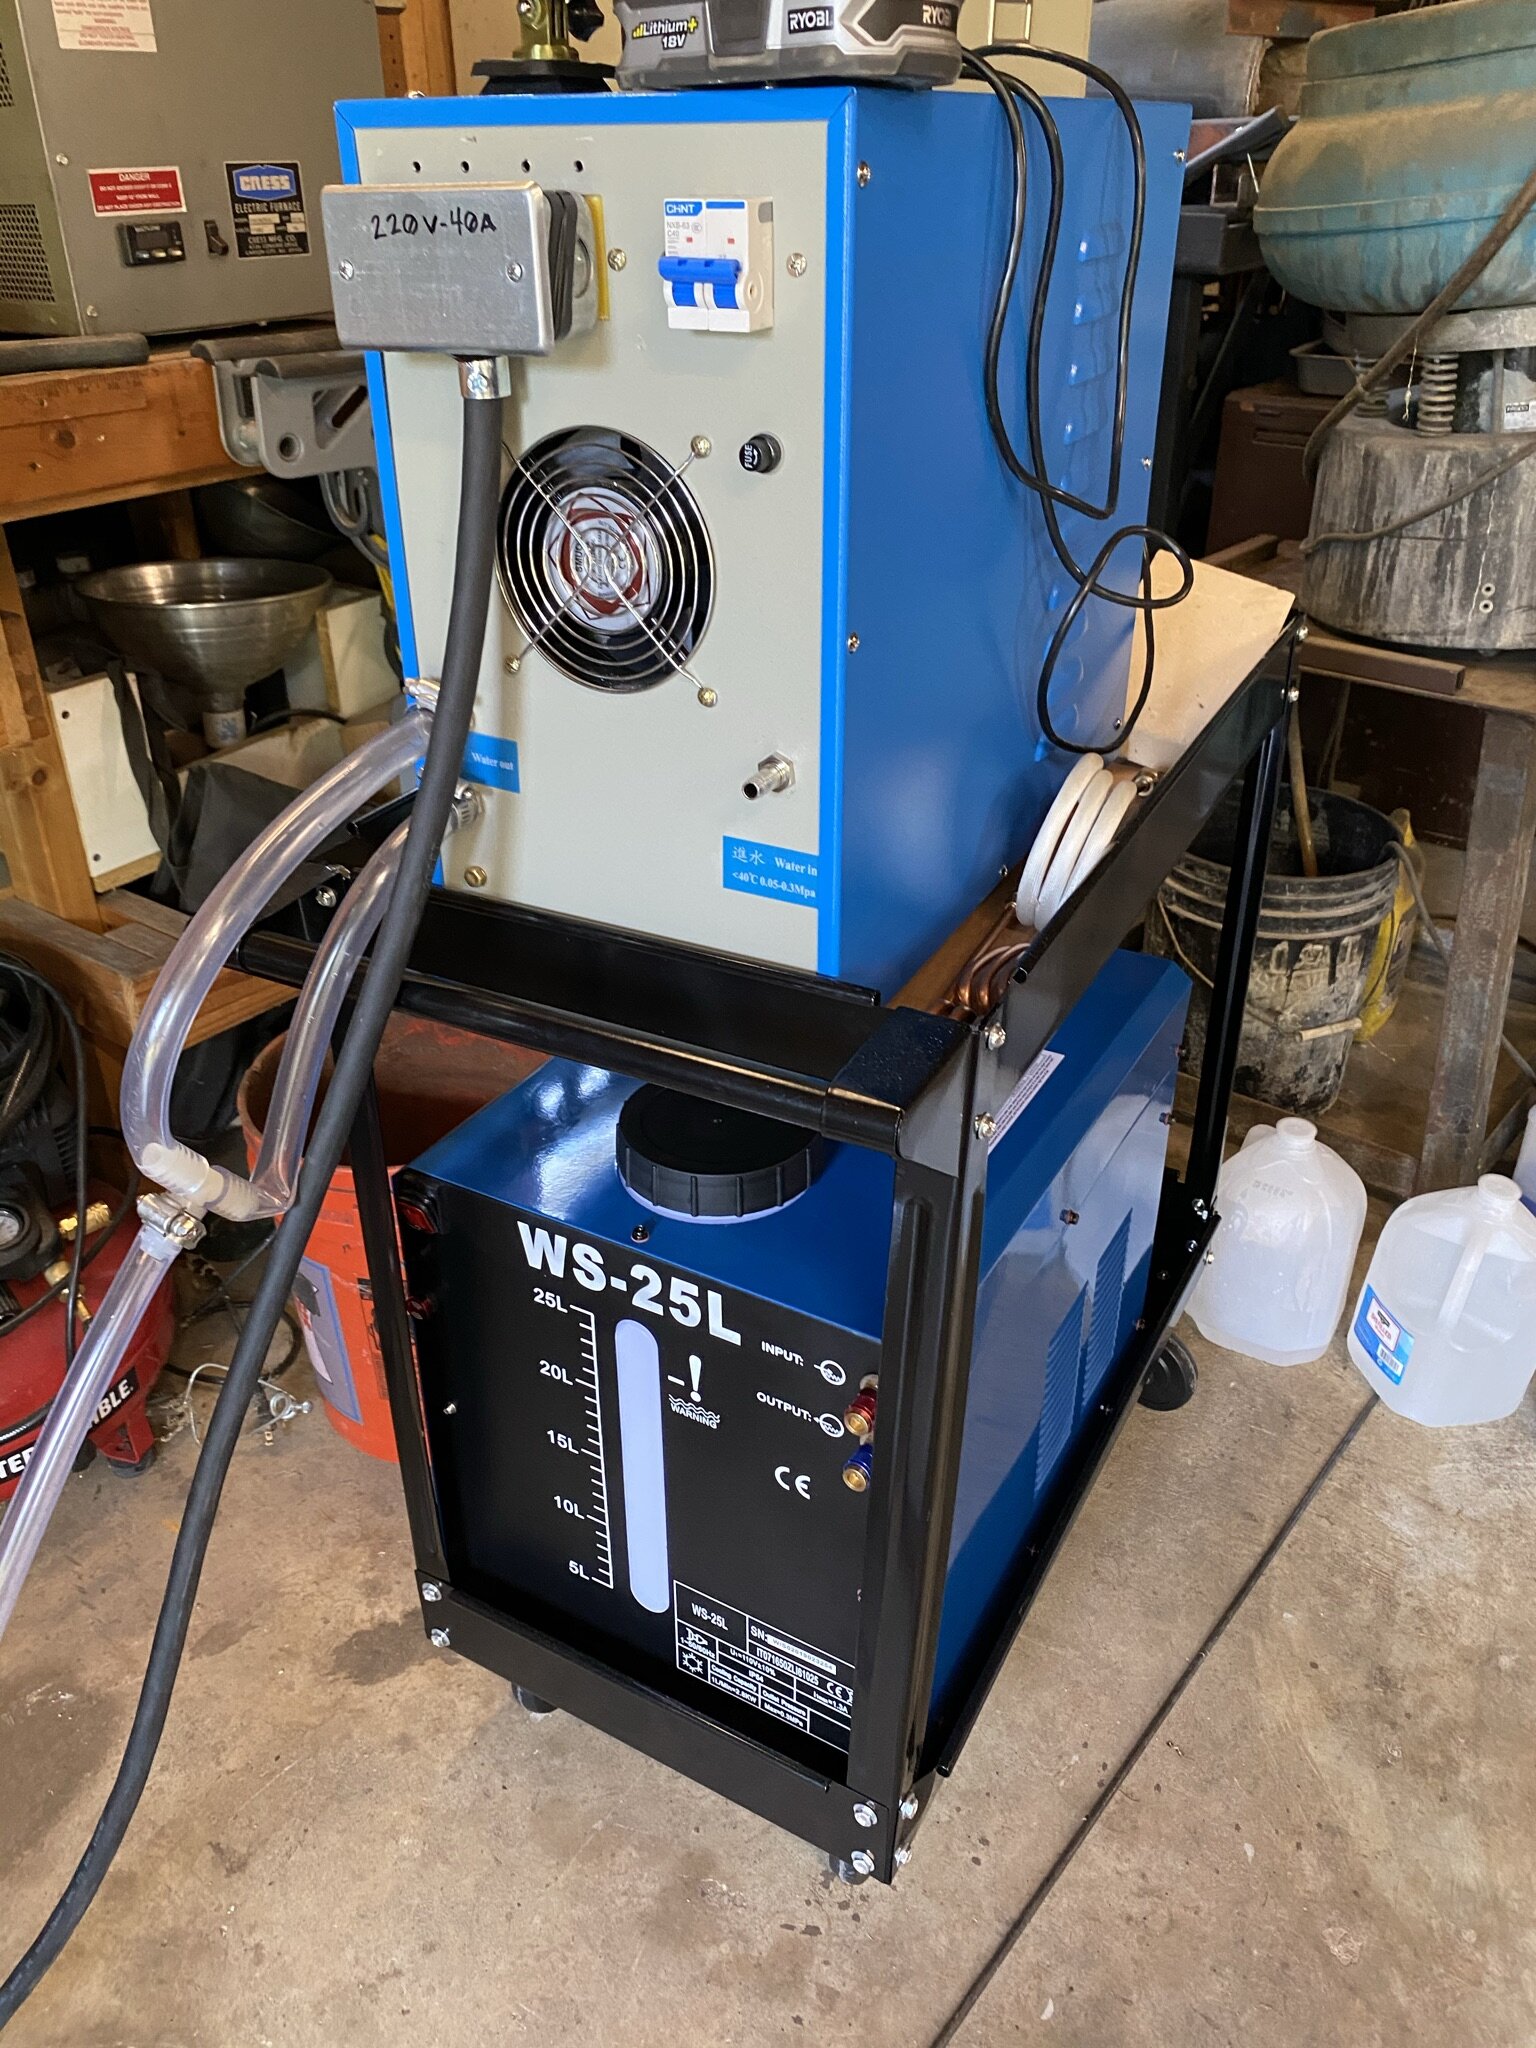
These machines REQUIRE water cooling; they absolutely will not function without it. You can make your own DIY cooler or buy a cooling system, either way you must account for some kind of water cooling when you’re looking at buying one of these machines. There are really only 2 requirements for the water-cooling system, sufficient pressure and a correct temperature range of the coolant. Without adequate pressure or the correct temperature, the machine will alarm with a ‘water fail’ condition, meaning it will emit a loud tone, and it will not work. This alarm is a fail-safe to prevent you from damaging your machine. When I first set my machine up, I plumbed a garden hose with a ball valve at the ‘water in’ port on the back and ran the ‘water out’ line to another hose that drained into the yard. The ball valve only had to be opened about ⅓ of the way for me to have sufficient pressure and since the water was only going through the machine once, it was perfectly capable of maintaining the proper cooling temperature. I think this garden hose/tap water solution would work as long as you don’t have ‘hard water’ in your area that could cause deposits and buildup in the machine. At the time of writing this document I am now using a dedicated Tig cooler filled with 6 gallons/25L of distilled water. In the wintertime, depending on your climate you may need to add some kind of antifreeze agent (see note below in December update.) The manufacturer of the Induction machine does not recommend it, but many Tig coolers are also sold with an antifreeze agent, so I’d imagine it’s probably ok for periodic use during extreme cold. I am using this 25L unit because I wanted a ‘self-contained’ system that I could mount on a cart and roll around, only having to worry about power cords, rather than power AND water lines running all over the shop. If that’s not a concern for you, you can certainly just run a water line into the machine and out to a drain, again given that you have sufficient pressure to the machine.
Updates & Troubleshooting the DIY Machine
December 2020 Update As the weather has cooled, I’ve been concerned about the distilled water in the system freezing. Some people in the Induction Forge Facebook group have said that they add various kinds of antifreeze to their system in the winter. So far, I have not seen the water temp in the shop get below 40’s inside the shop. One of the members of the Facebook group contacted US Solid who told them NOT to add an antifreeze agent to the system. For now, I don’t know that I’ll need to worry about that but if you live in extreme cold, you will likely need to research what is the best way to keep the system from freezing up. I have heard of some guys keeping small space heaters nearby during the coldest times. I’ve now had the Tig cooler up and running since August, in use almost daily and so far I believe that I am safe in reporting that the 25L Tig cooler seems to be an adequate cooling system. Since I’ve added the thermometer I’ve been able to see that the water temperature in the Tig cooler stays around 85-90 degrees during late August temperatures before ever turning the machine on and in the 50-60 degree range in these cooler months. I did several longer forging sessions in the late summer and never saw the water temps go over 110-115 degrees. Most of the time, I’m only running the machine for about a minute or so to get a heat and then there’s a break while I forge. I believe during that break the Tig cooler is able to cycle water adequately enough to keep the system working, even during summer months in Mississippi. I think the alarm trips at 130 degrees on most 15kw induction forges.
January 2021 Update The weather has gotten into the 20’s here a couple of times now, however my shop is lightly insulated and seems to keep the machine from ever getting down below freezing. The lowest I’ve read the water temp now is in the low 40’s on the coldest days so far. I don’t think I will need an antifreeze agent but I have spoken to a few guys who suggest other water additives that may be a good idea like algicides, etc.
July 2021 Update - PROBLEM ENCOUNTERED and resolved with the cooling system. Bottom line, DO NOT USE STANDARD ANTIFREEZE in these machines, even temporarily. If you feel you need an antifreeze agent, use a dedicated Tig Coolant. I have also heard that 'RV antifreeze' can work but I don't have experience with it. Find a coolant that is labeled "Low Conductivity Antifreeze/Coolant." These apparently contain a base of ethylene glycol and deionized water, 50/50. Back in January, I did decide to add a bit of antifreeze to try and avoid having any water freeze inside the machine and possibly result in damage. Looking back now, I believe that was a mistake because I did not immediately flush the system and re-install clean, new distilled water. I tried to use the induction machine yesterday and noticed that it kept beeping a warning and the ‘water fail’ alert LED was blinking and would it not heat material. After determining that the Tig cooler was still pushing a good flow of water I decided to investigate the water flow system in the induction heater itself. I started by removing the heating coil from the front of the machine and the tubing from the ‘water out’ ports on the back. I blew compressed air in both sides of the coil-connectors at the front of the machine. One side allowed air to freely flow all the way through the machine while the other did not. Once I established that one side was blocked, I decided to pull the cover off of the machine and I found 4 areas where copper limescale had built up and caused blockages in several of the water tubes. To fix the blockages it was a simple manner of disconnecting the tubing, clearing it and re-installing it. I then drained the entire system of the old, dirty water, flushed the system with a vinegar mix (not sure if that helped anything or not) and then re-filled the Tig cooler with 6 gallons of new distilled water. The pictures below show what I found when I opened the case on the induction heater:


Update on 25L vs 10L cooling units There has been some discussion about whether or not a 10L tig cooler is sufficient to cool these induction units. Bob Menard over at Ball and Chain Forge tried the 10L and it worked until the machine was put under heavy use. This is what he had to say about his experience with the 10L:
“I have been getting heavy use out of my new induction unit for the past week. I would like to report on the water cooler I got for it. It is the 10L. I found it would allow me to heat and punch 3/4" holes in 2"x 3/4" flat bar all day without issue. Yesterday I switched to a different phase of the same project. Now I am punching a 3/4" hole on 1 3/8" square bar. The first hour went fine but that is when the cooler stopped keeping up. The rest of the next hour I was tripping the water fail after 60 sec. of heating. That was enough time to allow me to keep working. The unit would reset after 20 sec or so. I guess I can say the 10L may not be up to the task for larger forging. I'll keep working on it and see what further information I can pull out of it.”
So, the unit was working but required some extra cooling time. He is in a somewhat cooler climate than I am so I would suggest if you’re in a hot area, the 10L may need some modification to work well. Some suggestions offered to him were to run the return water line inside the tank through a copper coil to increase the cooling capability and also to simply run the lines externally to a larger tank. I may add the copper tubing to mine as that seems like a pretty safe way to add more cooling without having to add more capacity.
Here’s what Bob did to expand the cooling capacity of the 10L tig cooling unit:


Update - October 2022 The picture below is a double coil in use. I have found that THIS is one way to stress the 25L tig cooler. Apparently using two coils at once to heat steel causes so much heat in the machine that it struggled to keep it cool and failed with a water alarm in about 30 min of use. Just be aware that if you have a double coil, using both will decrease your cooling capacity fairly quickly.

January 2023 Update The induction machine has been running, mostly problem free for me since since July 30, 2020. Besides the issues I encountered after trying to use anti-freeze I have had no major malfunctions. One small issue that seems to have popped up in the last year is related to the pedal, or the power cycle. On a few occasions in 2022 I noticed that after I released the foot pedal to stop heating material, the machine would continue to supply power to the coils and heat material, as if I had not released the pedal. I took the foot pedal and blew it out with compressed air, checked the connection to the machine and also looked at the power cycle settings to make sure something had not changed there. After cleaning the pedal, the issue seems to be better but I do occasionally see this happen. I do not yet know what to make of the issue. When it happens, I can press the red ‘stop’ button on the machine and kill the power cycle just as releasing the pedal should. I also noticed during a routing coil change that one side of a highly utilized coil seemed to be slowly building up a teal-colored corrosion inside the copper. I used a small file to remove as much of this from the flared, open end of the coil and blew it out with compressed air. I do not think this is a major issue but is probably something I need to keep an eye on during routine coil changes to make sure corrosion inside the coil is not limiting water flow through the coils.
March 2023 Update
Foot pedal issues resolved and teal-colored copper residue found in the rear warm water out tubing.
I was able to resolve the occasional foot pedal issues. I disassembled the pedal (see pics below) and found that there is a small sheet-metal lever that the pedal depresses when pushed down and that metal lever is what activates the switch button to flip the machine on/off. That lever was bent down from use and was no longer fully releasing the button when the pedal was released. The fix was to simply bend that lever back ‘up’ so that it allows for proper pressure and switch button engagement. I also noticed that there was a build up of the teal-colored copper oxidation in the clear tubing for the warm water leaving the machine. I pulled the tubing off and dumped the residue out. This probably means that there may be some residue/buildup inside the machine that I need to inspect soon as well.

June 2023 Update - How to bypass the water flow alarm
Received an email from induction machine user Jim Kennedy. “I have an existing water chiller (refrigerated), which I tried. I found that the flow rate appears to be up to 20 LPM, but the pressure could be too low, and the heater gives a warning light/beep (water leak). I have inspected the unit; there are no leaks and there is plenty of flowing through the unit. I have read that the 15kW units could need 25 PSI at 7 LPM and think that this is creating the error/warning. I found a way to by-pass this sensor and force the unit to work.”
Jim found that if you unplug this sensor, the flow sensor is disabled and allows the machine to work. I would just caution that this should be a temporary bypass and not a permanent fix in that you could wreck your machine with insufficient cooling in the long run. Note: the location of this sensor in your machine may vary, Jim just traced the wires by color from the sensor. Pics below that Jim sent. Thanks Jim!!

Unplug this sensor to bypass water flow alarm

Water Sensor - note the 2 white wires - trace those back to the board
August 2023 - Another Foot Pedal Fix
ACME ANVIL FORGE & Robbie Carmack in the Facebook group have both replaced their pedals with a much more robust version. Here are some pictures and part numbers if you want to do the same pedal swap:
Pedal https://a.co/d/gTDRYMy
4 pin connectors https://a.co/d/gbxDsB7
Cable Any standard 18ga 3 strand power cable should work. https://a.co/d/eiMKvvK


November 2025 Updates: Additional Tips for Maintenance & Reliability - it’s been almost 5 years now and my machines are still running quite well. But I just wanted to add the following tips:
Keep Spare Internal Hoses on Hand!
Over time, the internal coolant hoses inside the LH-15 (and most 15kW Chinese induction machines) will eventually fail. Heat cycles, vibration, and constant pressure cause them to become brittle or develop leaks. It’s a good idea to keep replacement hoses on hand so downtime is minimal when one finally gives out.
Coolant Note: Emergency Antifreeze Option
As noted, your coolant mixture should normally be a distilled-water and or a proper industrial coolant designed for induction units and TIG/Plasma coolers. However, in a pinch, I know of at least one user who successfully used a vodka-and-water mixture as an emergency antifreeze solution. Not ideal—but it worked until proper coolant could be obtained. =)
Use Anti-Seize on Coil Adapters
From John Perilloux. The threaded adapters that connect the machine’s output ports to your induction coils can seize over time due to heat and moisture exposure. A light coating of Loctite LB-8150 anti-seize on the threads helps prevent galling, corrosion, and stuck fittings. This makes swapping coils faster and reduces the chance of damaging the threads on the machine.
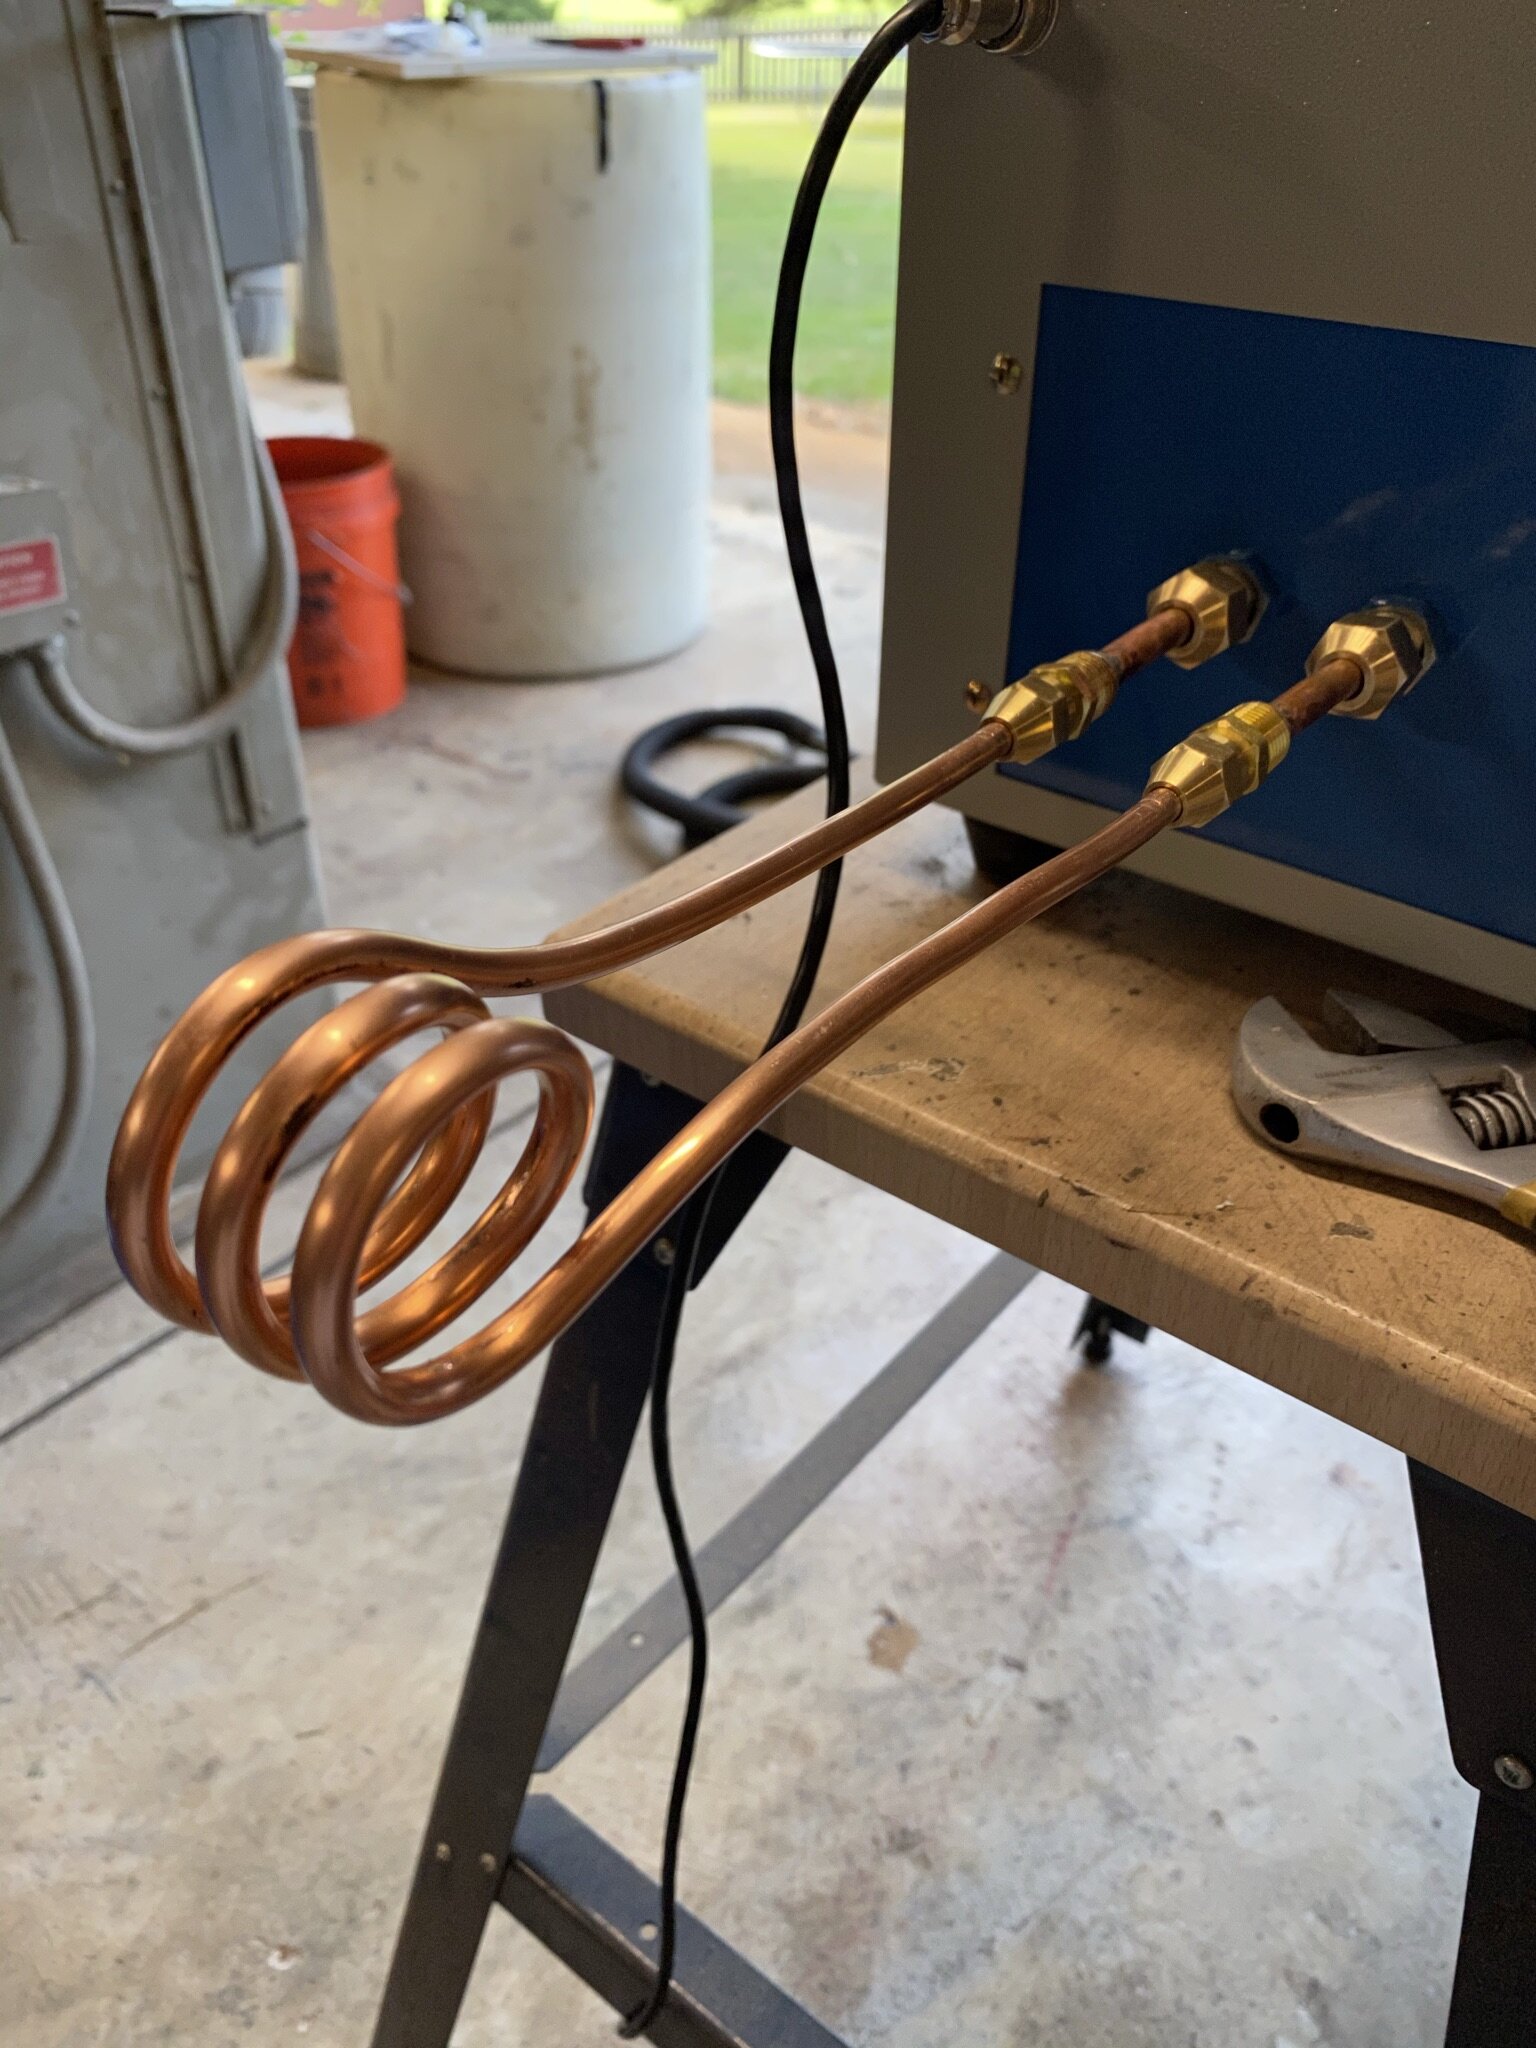
Making Your Own Coils
You’ll very likely be making many different coils to match the various sized material you want to forge with the induction heater. It’s not a difficult process and there’s little I can say about making coils that’s any better than what EJ says here:
I made my first couple of coils by winding ¼ inch copper refrigeration tubing around a different size of black iron pipe. I went slow and did not need to fill the tubes with sand, salt or water to prevent kinking. Those are valid methods for helping to prevent kinking when bending copper tubing for more aggressive shapes like pancake or rectangular coils and should be used then to avoid wasting the costly copper tubing. Again, EJ has some great info in the video above about how to make various shapes. Most importantly, the coils should be appropriately sized for the material you are planning to heat. According to what I have seen and read, you should make the coils with approximately 5mm of space between the material being heated and the inside diameter of your coil. Initially, I had trouble getting the material hot enough when trying to heat ½ inch square mild steel bar with the LARGE 2.5-3-inch coil that came with my machine. When I made an appropriately sized smaller coil, I was able to get that ½ inch bar to a spark-throwing, welding heat in less than 30 seconds at full current.
Note: You may cause the machine to beep at you when it encounters a problem with not enough resistance in the material to form a proper current. Usually this only occurs when you’re trying to heat too much material at one time, typically with too-wide coils. One solution here is to heat just the end of the material and then, when it’s glowing, gradually push more steel further into the coil. The heated material offers less resistance and will then heat accordingly. The best way to resolve this issue is to make a slightly smaller-width coil in my experience.
One last note about coil making. You have to make a good ‘flare’ on the coil for it to seal properly. Invest in a decent tube flaring kit. I made the mistake of buying the cheapest one I could at a local auto parts store, it worked but more often than not I would have to re-flare the ends of the tube 2-3x before getting a good, water tight fit.
Also: See links below for a link to a PDF on coil making
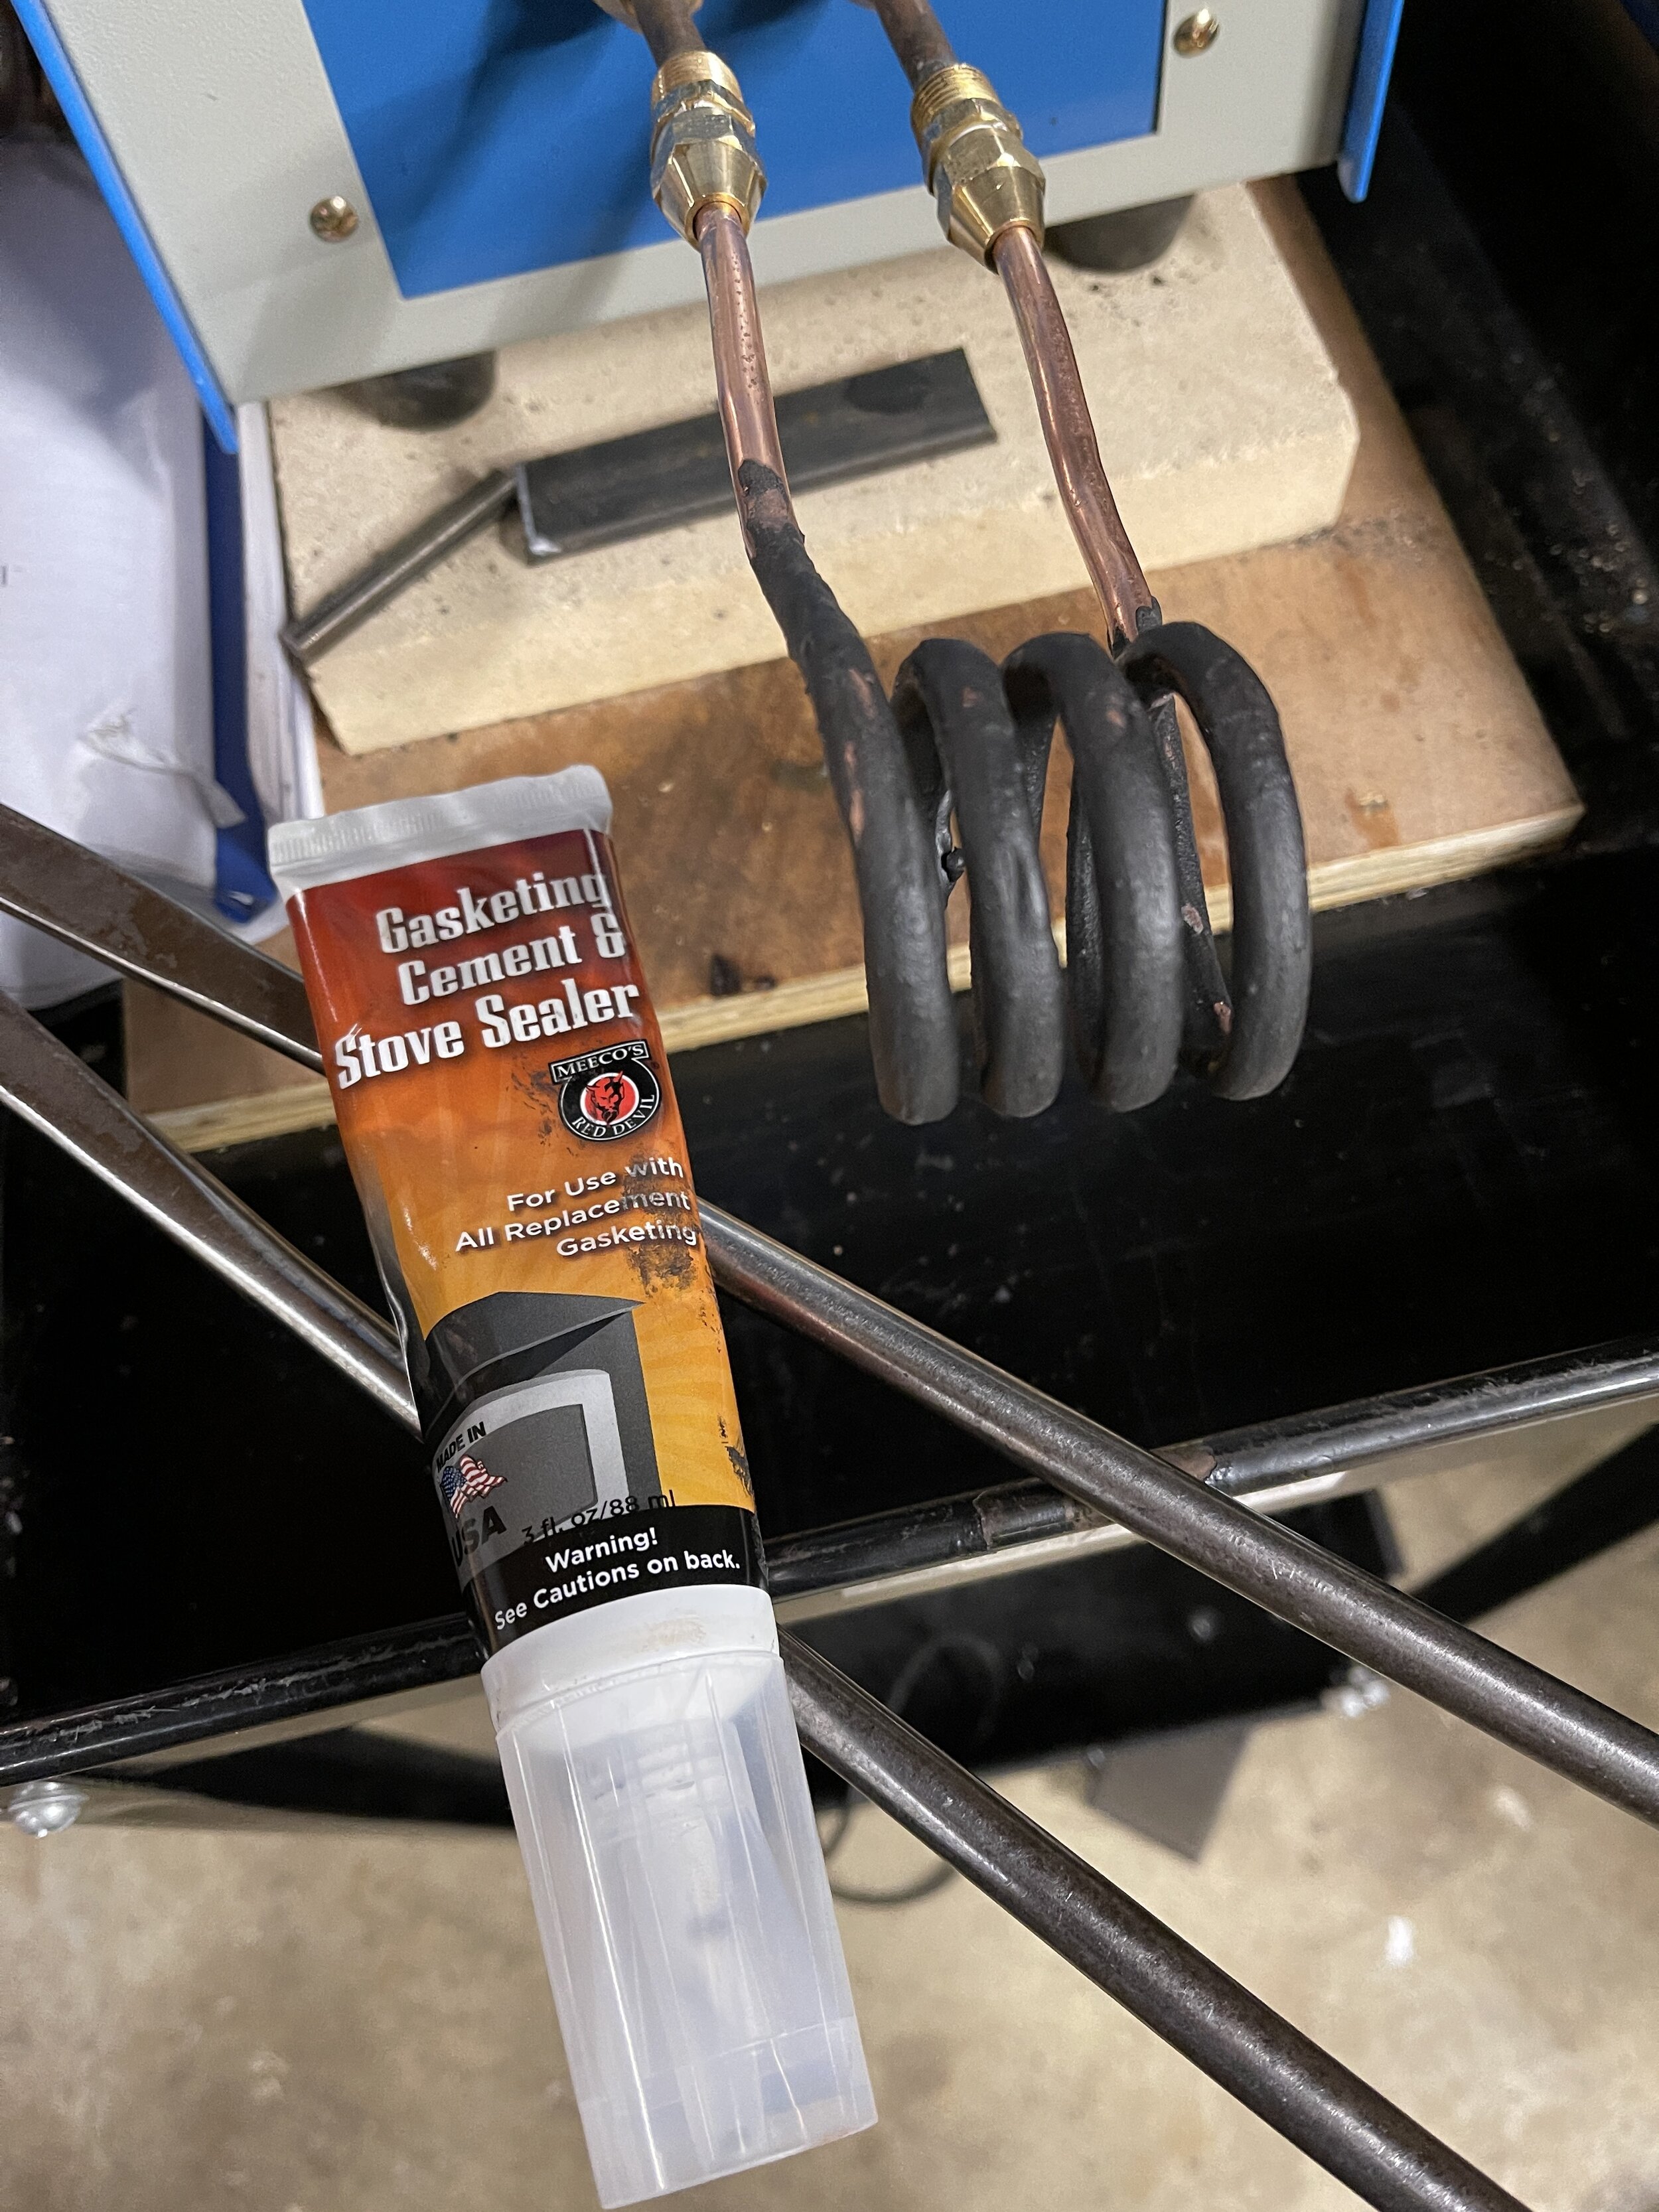
Maintaining the coils I coat the coils with Meeco Gasketing Cement and Furnace Sealant. It’s a somewhat sticky substance that dries to a hard, rubber like coating and resists temperatures up to 2000F. Having the coil coated with this sealant or a ceramic flexible tubing does not affect the heating capabilities at all and keeps you from making contact with the copper and causing a short, which almost always results in a startling shower of sparks and if done enough, can burn a hole in your copper tubing and allow water to suddenly spray out of the coils. UPDATE: Since I’ve been using the gasketing cement I’ve found that I need to re-coat the coils occasionally as I wear through the coating from being careless with material in the coil. It’s not a big deal, I just keep some gloves and the tube of cement by the machine.
Buying Pre-Made Coils
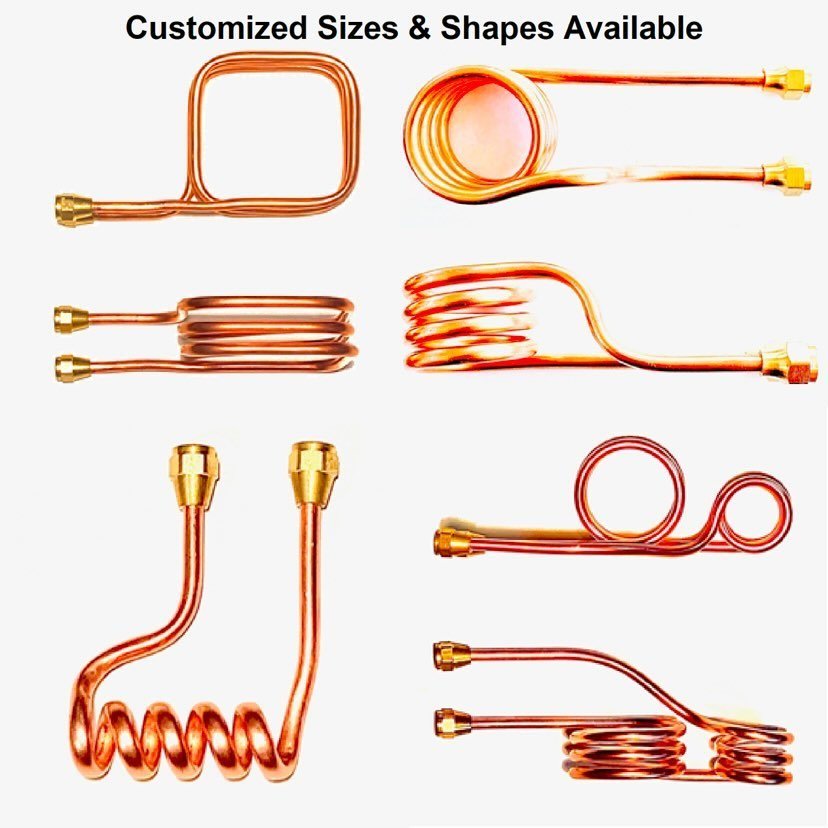
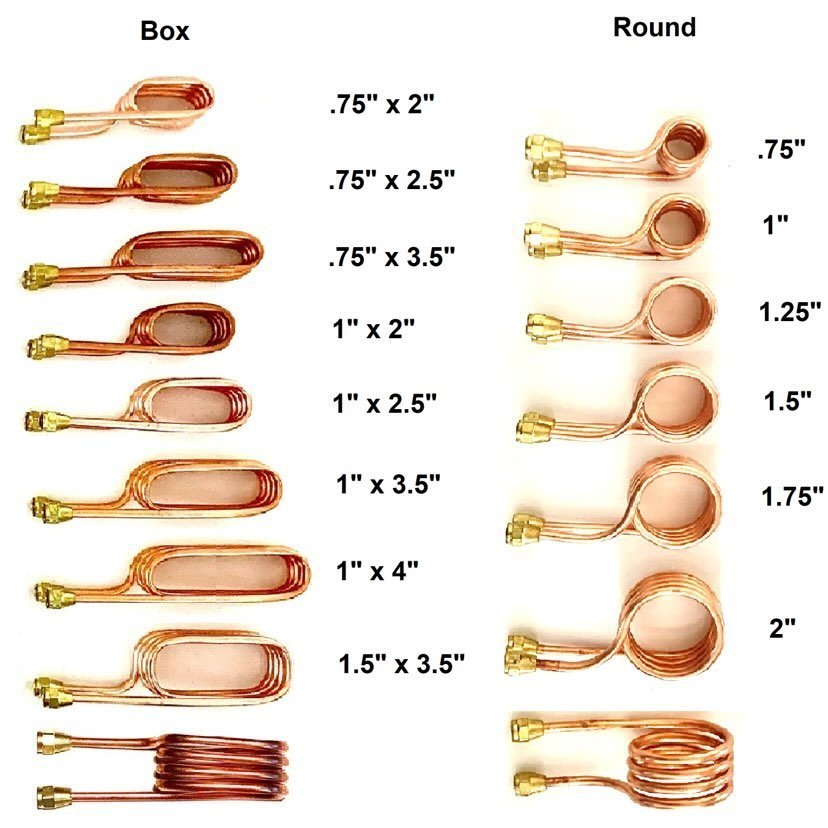
Terry Cash with Cluaran Forge has begun making coils for these 15kw induction machines and so far, he’s making the highest quality coils I’ve seen. These coils will need the 8mm to 1/4 adapter I mentioned above. I’ve used several of them and can definitely recommend him if you’d like to buy coils, rather than make them. Terry has built up quite a library of coils for sale, his website is https://cluaranforge.com/ contact him there to purchase. Here are some of the coils he can make.
As of September 2024, Terry is now offering an AMAZING and incredibly useful ‘quick disconnect’ system for these induction machines. I’ve been using them now for a few months and I can say without a doubt, they are a game changer when it comes to making coil-changing MUCH faster and more reliable. You can get more info on the quick disconnect system here. https://cluaranforge.com/products/quick-disconnect-system


Using 15kw Induction Machines for Metal Smelting
When it comes to using 15kw induction machines for smelting, the choice of crucible plays a crucial role. To be specific, you need a crucible that resides within some form of insulator to protect the copper coils from the intense heat generated during the smelting process.
From my own experience, standard clay graphite crucibles aren't ideal. They tend to be too large and their shape often complicates creating an effective insulator around them. However, recent success stories I've seen include Brian Housewert, Wesley Alberson, and @vcihandforged on Instagram, who all use an "induction crucible". This crucible type is available on Amazon under the name "OTOOLWORLD Induction Gold Melting Furnace Crucible set Graphite crucible ceramic container 2KG SET".
This YouTube video demonstrates someone melting steel using a similar kind of crucible. In the video, the host mentions that their machine, from a company called RDO, takes 500 seconds (roughly 8 minutes) to melt steel. The machine, requiring 220v single phase power, is of a similar build to the 15kw machines we use, falling somewhere between 5kw and 12kw. Interestingly, their machine comes standard with an 'induction crucible', much like the OTOOLWORLD model that seems to perform well with the 15kw machines we use. You can find more information about RDO and their machines here.
When attempting smelting operations with these machines, the correct crucible is not the only factor to consider. The type and length of coil used, as well as the machine's overall capabilities, also play a key role. Recently, it's been noted that 15kw induction machines offered by US Solid, specifically those with a '16:2' turns ratio, seem to be more equipped for smelting tasks, presumably due to their ability to handle coils with more turns (i.e., longer coils). If you're purchasing a machine with smelting in mind, the 16:2 machine could be a good option, but for a more in-depth understanding, refer to our section on 'Understanding Turns Ratio in Induction Machines'. Lastly, regarding the coil, it appears that a 5-turn coil works best for smelting.
These insights are based on my limited experience and understanding, so your mileage may vary. Please keep in mind that this information might not be entirely accurate and that your ideal setup will depend on the specifics of your process, the type of metals you're working with, and the coils being used.
Understanding Turns Ratio: 16:1 vs. 16:2 Induction Machines
When using an induction machine for metalwork, one must consider the "turns ratio," a key parameter that impacts how these machines perform in different applications. The turns ratio relates to the number of turns in the primary coil (attached to the power source) to the secondary coil (generating the magnetic field). Let's dive deeper into how the turns ratios, specifically 16:1 and 16:2, affect smelting and forging processes.
1. 16:1 Turns Ratio for Forging
A 16:1 machine, with fewer turns in the secondary coil, can generate a higher initial heat concentration. This could be beneficial for forging operations where the metal needs to be sufficiently heated for shaping, but not melted.
The design of the coil plays a crucial role. For some types of forging, specifically when forging the size of material these 15kw machines excel at (1 inch diameter or smaller) a smaller, more focused coil may be desirable, making a 16:1 machine a potentially better fit for forge work.
Consideration of the workpiece size is also important. For smaller workpieces or thinner metals, a 16:1 machine might provide the right heat levels and distribution.
2. 16:2 Turns Ratio for Smelting
A 16:2 machine can handle longer coils with more turns. This feature enables it to generate a larger and sustained heat field, a key requirement for melting metal into a liquid state during smelting.
The 16:2 turns ratio may provide a more even heat distribution due to the increased number of turns in the secondary coil, leading to a more efficient and uniform melting process.
For larger workpieces or thicker metals to be smelted, a 16:2 machine might be more suitable due to its heat distribution capabilities.
These are general observations, and given the complexities of induction heating processes and my current level of understanding, they may not be entirely accurate. The optimal choice for an induction machine will largely depend on the specifics of your process, the type of metals you're working with, and the coils being used. While a 16:1 machine may not be as ideally suited for smelting as a 16:2 machine, it's important to note that with the correct crucible and coil combination, it can still effectively accomplish the task.
Helpful links & Documents
Induction Forge group on FaceBook
https://www.facebook.com/groups/758762180850373/
Rocky Creek Forge’s Writeup on his Induction Forge - probably the cleanest, most useful induction forge cart setup I have seen. Seriously, go see it!
http://therockycreekranch.com/induction-forge
EJ of the Anvil Youtube Channel - GREAT INFO
https://www.youtube.com/channel/UCRRCSJ1ZNe3Sa-PmfsJsPzA
James Binnion posted a link to this VERY helpful book on Coil Making to the Facebook Group
https://www.ambrell.com/hubfs/Ambrell_PDFs/411-0190-00.pdf?fbclid=IwAR3KlJMpPCj8Tu1ep_XFaiHYzRFghILDDXUdIbKlm3MC4MZWp_fftTuGq1I
A thorough write-up by David Roberts on his build, including some estimated power cost/consumption data and details on his DIY water cooling system
https://www.iforgeiron.com/topic/59781-15kw-induction-forge-build-us-solid-pic-heavy/
General induction forging info:
http://www.mooseforge.com/Forges/induction.html
Cluaran Forge - Terry Cash - Maker of fine induction forge coils of all kinds
https://cluaranforge.com/
The Mettle Works - coil making parts, info, etc for the LH and SP types of Induction heaters (NO LONGER IN BUSINESS)
http://www.mettleworks.com/hot/index.html
SP-15 spec sheet (Same as LH15 for all intents and purposes)
http://www.inductionforge.net/images/SP-15Aspec.pdf
Good info, a bit deep and a different model induction machine but still good.
https://spaco.org/Blacksmithing/ZVSInductionHeater/1000WattZVSInductionHeaterNotes.htm
US Solid Induction Machines
https://ussolid.com/u-s-solid-15-kw-high-frequency-induction-heater-30-80-khz-220v-or-110v.html
Coal Ironworks Induction Machine
https://coaliron.com/products/induction-forge
Frequently Asked Questions
1. What’s the cost to run that thing? Doesn’t it kill your electricity bill??
This is probably the most common question I encounter right after, how much does that machine cost? I did a year-to-year comparison of my electric bills comparing the year before when I did not have an induction machine vs a solid year of using one, nearly every day. My average monthly electric bill increased about $10-$15 per month. Normally, when I tell people this, they just don’t believe it. it’s important to remember that these machines are only really drawing high amperage when heating the material. When they’re running idle, the only thing that’s really pulling power is the fan and the tig cooler, both of which are 110v machines that don’t draw much power. The BIG savings for me has been in how much propane I have NOT used since moving to induction. In the first year of having the induction forge in the shop, I filled up my big 100lb propane tank ONE time. Previously, I was filling it on a monthly or semi monthly basis at nearly $100 per filling. So, it’s easy for me to say the induction forge has saved me money when it comes to fuel expenses.
2. What happens if you touch the metal to the coil? Do you get shocked?
No, nothing happens unless you make two points of contact in the copper coil. This will cause a short and you may hear a pop and see some sparks but it doesn’t shock you.
3. What happens if you stick your finger in there?
Yes, this question is asked a LOT. Nothing happens. You can stick your finger in the coil and press the pedal. It’s only going to heat metal. However, if you happen to have a metal splinter, a ring on or a lot of metal dust on your finger, it’s not going to be pleasant. I do not recommend sticking your finger in the coil.
4. Can I use this machine to make Damascus?
This is perhaps the 2nd most asked question. Yes, you could but the billet would be really small due to needing to fit inside a coil the machine can properly use. It’s not ideal for that application, Damascus needs to soak at a high heat to be able to set the welds properly. These machines are more about fast, localized heat. I like to tell people that these machines ‘function’ a lot like an acetylene torch, would you use a torch to make Damascus?
5. Can I use these machines for bladesmithing/knife making?
Absolutely, just remember to size the coil appropriately for the blade stock and keep the blade moving, these coils tend to heat the steel from the outside edges in and it can be easy to overheat the edges.
A few videos I’ve made using the induction forge